With the ribbon command Home | group Format | Shading you can apply a colored shade or fill pattern to cells.
Applying directly via the icon of the command group "Format"
If you click on the small arrow next to the icon ![]() Shading, the program will open a dropdown menu with Standard colors and Color variations. You can apply these directly to the selected cells by hovering over the colors with the mouse cursor (you can see the effect on the cell in the preview) and then clicking on the desired color.
Shading, the program will open a dropdown menu with Standard colors and Color variations. You can apply these directly to the selected cells by hovering over the colors with the mouse cursor (you can see the effect on the cell in the preview) and then clicking on the desired color.
Tip: The last selected color is displayed in the icon as a small horizontal bar. If you want to apply the same color to other cells, simply select them and click on the icon itself (not the arrow). PlanMaker will then reapply the last selected color.
This also applies to other shading settings, such as Patterns or Shades, which you can only find in the dialog box. You open the dialog box by clicking on the icon's arrow and choosing More. Detailed information on the options of the dialog box can be found below.
Removing shading: Click on Transparent in the dropdown menu to remove existing shading.
Other options: Via the dialog box
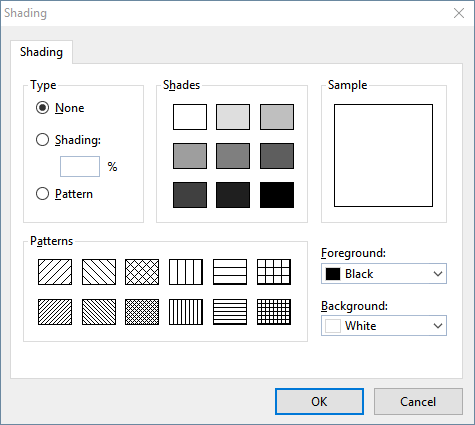
The dialog box contains additional shading options. The option Shades allows you to mix colors individually, and you can also apply different Patterns in the dialog box.
You open the dialog box by clicking on the arrow of the icon ![]() and choosing More in the dropdown menu.
and choosing More in the dropdown menu.
Alternatively: On the ribbon tab Home | group Alignment, click on the group arrow![]() and switch to the Shading tab.
and switch to the Shading tab.

Proceed as follows in the dialog box:
| 1. | Select the desired cells. |
| 2. | On the ribbon tab Home | group Alignment, click on the group arrow |
| 3. | Apply the desired shading (see below). |
| 4. | Confirm with OK. |
You can choose between the following types of shading:
▪Adding a shade
| A shade is a color shading that is mixed from the selected foreground color and background color. |
| To add a shade, set the Type to Shading and then make the desired settings: |
| First, set the desired Foreground and Background colors. (The background color is set to white by default.) |
| In the section Shades, different mixtures of these two colors are now offered. Select one of these suggestions. Alternatively, you can enter an exact percentage for the shade in the input field under Shading. Values between 0 (100% background color) and 100 (100% foreground color) are allowed. |
▪Adding a pattern
| To add a pattern, click on one of the patterns in the section Patterns. |
| You can also select a different Foreground and Background color for the pattern. |
▪Removing a shade or pattern
| If you want to remove existing shades or patterns, select None for Type. |
Then confirm with OK.