iOS: This command is not freely available in this version.
With the ribbon command Insert | group Slide | Summary slide, you can create a slide that lists the headings of all slides of the entire presentation. This enables you to quickly and easily place a table of contents or agenda at the start of a presentation.
Tip: Alternatively, you can choose the command by right-clicking in the mini sorter to open the context menu.
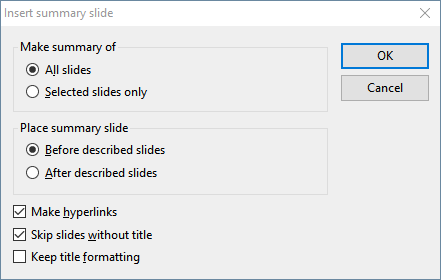
The following dialog box appears:

You can use the options in this dialog box to determine how the summary slide should look:
▪Make summary of: If All slides is enabled, the headings of each slide in the presentation are listed on the summary slide. If Selected slides only is enabled, only the headings of those slides that you have currently selected in the mini sorter will be listed.
▪Place summary slide: Here, you can determine whether the summary slide is inserted into the presentation before or after the currently selected slides (or the current slide).
▪Make hyperlinks: If this option is enabled, a hyperlink is created to the corresponding slide for each heading listed on the summary slide. If the option is not selected, however, pure text (without links) is created.
▪Skip slides without title: If this option is selected, slides that do not contain a title will not be included on the summary slide.
▪Keep title formatting: If this option is selected, the formatting (font, font size, etc.) of the actual slide titles is used to generate the titles on the summary slide.
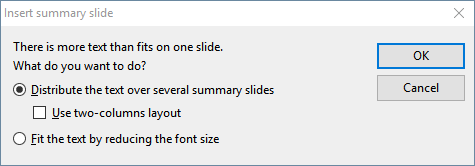
If the information that should appear on the summary slide is too extensive and thus does not fit on the slide, the following warning dialog box appears:

Here, you can decide whether you want to distribute the text among several summary slides or reduce the space required for the text by reducing the font size. If you use multiple summary slides, you can also select a two-column layout.