It can be very useful at times if you see marks indicating where to fold printed letters or where the hole punch should be used for filing. For this purpose, TextMaker has a practical solution: tri-fold and bi-fold marks.
You can select the pages of the document on which you would like these marks to appear (either only the first page, only even/odd pages or all pages of the document).
If you have divided your document into chapters (see section Dividing a document into chapters), the selection only applies to the selected chapters.
Note: If a new chapter is inserted after a chapter with existing tri-fold/bi-fold marks, the same marks will also appear in the new chapter.
To insert tri-fold or bi-fold marks, proceed as follows:
Click on the group arrow![]() in the bottom right corner of the ribbon tab Layout | group Page setup to open the dialog box and switch to the Fold marks tab.
in the bottom right corner of the ribbon tab Layout | group Page setup to open the dialog box and switch to the Fold marks tab.

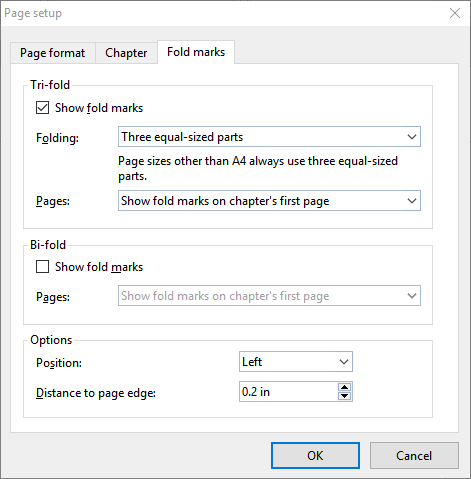
The dialog box contains the following options:
Tri-fold section
With tri-fold marks, you place a top and bottom mark in your document to indicate how to fold it. To do so, enable the Show fold marks checkbox in the Tri-fold section.
From the two lists below, select the distances at which the fold marks should be placed on the page and on which pages they should appear.
▪In the dropdown list Folding, you can choose between the following vertical distances:
| Three equal-sized parts: The fold marks divide the page into equal distances. This option is recommended; the other two options are mainly of interest to users who adhere to the DIN standards that are common, for example, in Germany. |
| A4 pages: small part on top (DIN type A): The fold marks divide the page into the distances 87 / 105 / 105 mm when viewed from the top edge of the page (form A according to DIN 5008). |
| A4 pages: large part on top (DIN type B): The fold marks divide the page into the distances 105 / 105 / 87 mm when viewed from the top edge of the page (form B according to DIN 5008). |
Note: If the paper size on the Page format tab is set to an option other than A4, fold marks are always automatically placed on the page as three equal-sized parts.
▪In the dropdown list Pages, you specify on which pages fold marks should appear:
| on the first page, on odd pages, on even pages or on all pages of the document. (A document that has not been divided into chapters is simply treated as a single chapter.) |
| If you have divided your document into chapters, the selection only applies to the selected chapter and not to the entire document. If you thus want to apply the selection to all chapters, you also have to select all chapters beforehand. |
Bi-fold section
With a bi-fold mark, you apply a central mark as an orientation point for punching a hole in the document. To do so, enable the checkbox Show fold marks in the Bi-fold section.
In the dropdown list Pages below it, specify the pages on which the bi-fold marks should appear:
on the first page, on odd pages, on even pages or on all pages of the document. (A document that has not been divided into chapters is simply treated as a single chapter.)
If you have divided your document into chapters, the selection only applies to the selected chapter and not to the entire document. If you thus want to apply the selection to all chapters, you also have to select all chapters beforehand.
Options section
▪Position
| Here, you can select whether the tri-fold/bi-fold marks should appear on the left, right or on both sides. |
▪Distance to page edge
| To change the lateral distance of the tri-fold/bi-fold marks, enter the desired value here or use the arrow keys. |
Changing tri-fold and bi-fold marks
For a normal document (not divided into chapters), you can easily change the tri-fold marks/bi-fold marks by opening the above dialog box again and selecting different options in the dropdown lists described above. The change is then applied to the entire document.
If you have divided your document into chapters and want to customize the display of the tri-fold marks/bi-fold marks for a specific chapter only, first place the cursor in the corresponding chapter and then select different options in the dropdown lists described above. The changes will then only be applied to the current chapter. To apply the changes to all chapters, first select all chapters accordingly.
Removing tri-fold and bi-fold marks
To remove tri-fold or bi-fold marks, disable the corresponding checkbox in the above dialog box.
If you have divided the document into chapters, first place the text cursor in the relevant chapter from which you want to remove the marks.