The Quick access toolbar is displayed below the ribbon. It contains a selection of frequently required default commands.
![]()
You can remove default commands from the Quick access toolbar by clicking on the black arrow to the right of the Quick access toolbar. The program will open a menu that lists the default commands. Here, you can remove the check mark in front of a command by simply clicking on it with the mouse. It will then no longer be displayed in the Quick access toolbar.
If you want the command to reappear in the Quick access toolbar, click on it again in this menu.
You will find three more items in this menu:
▪More Commands
| Use this item to open a dialog box with all commands available in FlexiPDF that you can add to the Quick access toolbar (see below). |
▪Show Above the Ribbon
| This allows you to change the position of the Quick access toolbar, which is then displayed above the ribbon rather than below it. |
▪Minimize the Ribbon
| If you enable this option, the ribbon will be minimized. Only the ribbon tabs and the Quick access toolbar will then be seen. For more information, see Showing and hiding the ribbon. |
Tip: You can also open these three commands by right-clicking on anywhere in the ribbon.
Adding/removing commands from the Quick access toolbar
Not only can you customize the default commands for the Quick access toolbar, but you can also choose from all other commands that are available in FlexiPDF. They can be added to the Quick access toolbar or removed again. To do so, proceed as follows:
| 1. | Click on the black arrow to the right of the Quick access toolbar. |
| 2. | Select More Commands in the menu that appears. |
| 3. | The program will open a dialog box in which you can customize the commands for the Quick access toolbar. |
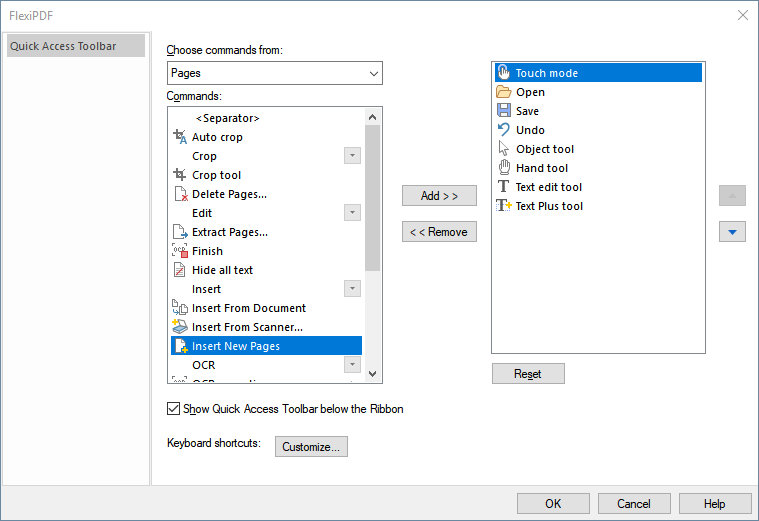 |
| 4. | In the dropdown list at the top left, first select the ribbon tab on which the command is located. The list below shows all commands of the selected ribbon tab. |
| 5. | In this list below, select the desired command and click on the Add button. The command will then be moved to the list on the right, where the existing commands of the Quick access toolbar are located. |
| You can use the Remove button, in turn, to remove a command from the Quick access toolbar after selecting it in the list on the right. |
| 6. | Use the buttons |
| 7. | Finally, click on OK. |
Tip: You can also add commands to the Quick access toolbar without this dialog box by right-clicking on a command icon directly on a ribbon tab. The program displays a menu in which you select Add to Quick Access Toolbar.
To remove: Right-click directly on the command icon in the Quick access toolbar and select Remove from Quick Access Toolbar.
Resetting commands of the Quick access toolbar
The Reset button in the above dialog box resets the Quick access toolbar to its original state.