Tip: For more information on exporting a particular image from your PDF file, see Extracting images. For information on exporting entire PDF pages as image files, see Image output.
To take a snapshot of an area of a page and save it to a file, proceed as follows:
| 1. | Choose the ribbon command Home | group Snapshot | Take snapshot  . . |
| 2. | Then use the mouse to drag a rectangle around the area of which you want to take a snapshot. |
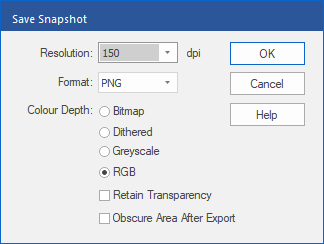
| As soon as you stop dragging, the box will be fixed and the dialog box Save Snapshot will open. |
| 3. | Select the Resolution of the snapshot. The higher the value, the more details the saved picture will contain and the more disk space it will need. |
| 4. | Select the desired Format for the output (PNG, JPEG or TIFF). |
| 5. | Select the Color Depth for the snapshot. |
| RGB (red/green/blue) is full color, while all other options are black and white variations. |
| 6. | If you would like a transparent background for the snapshot, click on Retain Transparency. |
| This option is only available when selecting the PNG format with the RGB color depth. |
| 7. | Press OK and enter a file name for the saved picture. |