To create an article thread, proceed as follows:
| 1. | Navigate to the page that contains the start of the article. |
| 2. | Choose the ribbon command Insert | group Articles | Thread  . (Click directly on the icon itself.) . (Click directly on the icon itself.) |
| 3. | Use the mouse to drag a rectangle around the first column of text in the article, which will result in an article box. These article boxes can be moved or resized after drawing as long as the Article tool remains enabled. |
| Tip: When moving, make sure that you click with the mouse in the center of an article box and not on its title at the top. To resize an article box, drag its corners. |
| 4. | Continue dragging boxes around subsequent columns, changing pages as needed to follow the logical order of the article. |
| 5. | Once you have selected the last column of the article in this manner, press the Esc key to complete the article thread. |
| The Article tool  will still be enabled and you can now edit the Properties. For more information, see below. Alternatively, you can also start another article thread if necessary. will still be enabled and you can now edit the Properties. For more information, see below. Alternatively, you can also start another article thread if necessary. |
| To finally exit the Article tool mode, press the Esc key again. |
Editing article properties
Make sure that the Article tool  is enabled on the ribbon tab Insert (recognizable by the dark color of the button) and proceed as follows:
| 6. | Click on one of the created article boxes. |
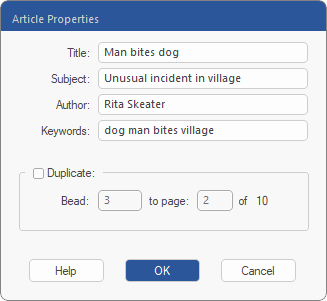
| 7. | Use the arrow of the Thread  icon to open its menu, and select Properties to display the article properties in the dialog box. icon to open its menu, and select Properties to display the article properties in the dialog box. |
| Tip: You can also open this dialog box by double-clicking on the article box. |
| 8. | The information you enter here will be used by some PDF viewers to display a list of articles in the PDF file so that users can select an article to read. |
| 10. | Set a check mark for Duplicate to copy the currently selected article box (which has a segment ID ("bead") within the article thread) to several pages. This is handy for documents with a uniform layout, where the text is always in the same place across a contiguous range of pages. |
![]() is enabled on the ribbon tab Insert (recognizable by the dark color of the button) and proceed as follows:
is enabled on the ribbon tab Insert (recognizable by the dark color of the button) and proceed as follows: