On the ribbon tab Home | group Alignment you can specify the alignment of the cell contents within the cell.
Before you execute the commands, you must first select the desired cells. To change a single cell, simply navigate to it.
Then, proceed as follows:
Aligning directly via the icons of the command group "Alignment"
Most of the options for aligning cell contents can be applied directly via the icons on the ribbon tab Home | group Alignment.
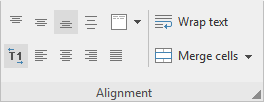
The following functions are available here:
Icon |
Function |
|
Top vertical alignment: Align the cell content to the top edge of the cell. |
|
Centered vertical alignment: Align the cell content vertically to the center. |
|
Bottom vertical alignment: Align the cell content to the bottom edge of the cell. |
|
Justified vertical alignment: The cell content is evenly distributed between the top and bottom cell border (only affects cells that contain multiple lines of content and have the option Wrap text enabled). |
|
Rotate: Here you can rotate the entire cell (including its contents) by the selected angle. The command Stacked corresponds to the option Vertical text in the dialog box (see below): The cell contents are not read from left to right, but from top to bottom (to disable it, click Stacked again). |
|
Wrap text: The cell content will automatically be wrapped to the next line if it does not fit into a single line. |
|
Merge cells: Lets you merge a cell with its neighboring cells. Merged cells are treated by PlanMaker as if they were one single cell. To do so, select the cell and any number of directly adjacent cells and click on the icon itself to merge the cells. Note: Whenever you merge cells, the content of all selected cells is automatically deleted – except for the cell in the upper left corner of the selected range. To disconnect merged cells, click on the icon again. |
|
If you click on the icon's arrow, you can choose from various options of merging cells: Merge cells: Corresponds to clicking on the icon itself, all cells are merged normally. Merge and center: The selected cells are merged and the cell content is centered horizontally over several columns (vertically at the bottom). Merge and turn on line wrap: Cells are merged while wrapping the cell contents in the created merged cell. If you selected cells across several columns, you can choose between the commands Merge by line or Merge by column to merge the selected cells to only one column or only one row. In addition, you can also disconnect merged cells from here using the Split cells entry. |
|
Default horizontal alignment: Text is left-aligned, numbers are right-aligned. Logical values and error values are centered. |
|
Left horizontal alignment: Align the cell content to the left edge of the cell |
|
Centered horizontal alignment: Align the cell content centered |
|
Right horizontal alignment: Align the cell content to the right edge of the cell |
|
Justified horizontal alignment: The cell content is evenly distributed between the left and right cell border (only affects cells that contain multiple lines of content and have the option Wrap text enabled) |
Most of these options can also be found in the dialog box of the command group Alignment (see below). In addition, the options enabled via the direct ribbon commands are displayed in the dialog box as both enabled. For example, if the ribbon command Wrap text is enabled for a cell, a check mark also appears in the dialog box in front of the option Wrap text.
Shortcut keys
There are also shortcut keys for horizontal alignment:
Command |
|
Windows/Linux |
|
Mac |
|---|---|---|---|---|
Left align |
|
Ctrl+L |
|
Cmd+L |
Center |
|
Ctrl+E |
|
Cmd+E |
Right align |
|
Ctrl+R |
|
Cmd+R |
Justify |
|
Ctrl+J |
|
Cmd+J |
Aligning via the dialog box of the command group "Alignment"
You open the dialog box on the ribbon tab Home by clicking on the group arrow![]() in the bottom right corner of the command group Alignment. In the dialog box you will find additional options that cannot be set directly via the icons of the command group Alignment as described above (e.g. Inner margins).
in the bottom right corner of the command group Alignment. In the dialog box you will find additional options that cannot be set directly via the icons of the command group Alignment as described above (e.g. Inner margins).
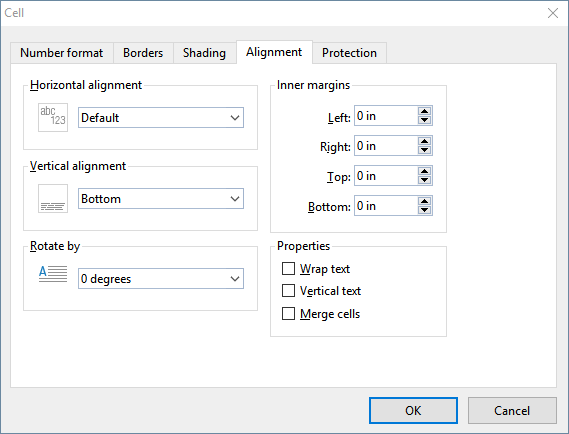
The dialog box provides the following options on the "Alignment" tab:
Horizontal alignment
Determines the horizontal alignment of the cell content within the cell boundaries:
Default: Text left-aligned, numbers right-aligned, and logical values and error values centered
Left: Align the cell content to the left edge of the cell
Centered: Align the cell content centered
Right: Align the cell content to the right edge of the cell
Justified: The cell content is evenly distributed between the left and right cell border (only affects cells that contain multiple lines of content and have the option Wrap text enabled)
Center across columns: The content of one cell is centered across multiple columns. Select the cell with the content and an arbitrary number of cells right of it beforehand (these cells have to be empty!). Then select the Center across columns alignment.
Vertical alignment
Determines the vertical alignment of the cell content within the cell boundaries:
Bottom: Align the cell content to the bottom edge of the cell
Centered: Align the cell content vertically to the center
Top: Align the cell content to the top edge of the cell
Justified: The cell content is evenly distributed between the top and bottom cell border (only affects cells that contain multiple lines of content and have the option Wrap text enabled).
Rotate by ...
Here you can rotate the entire cell (including its contents) by the selected angle.
Text direction
For text in Arabic script, you can change the text direction of the cell to right-to-left here. If you choose the default setting Context sensitive, PlanMaker determines the correct writing direction automatically.
For more information, see also Working with Arabic text.
Inner margins
Lets you modify the inner margins of cells.
Line break
If this option is enabled, the cell content will automatically be wrapped to multiple lines, if it does not fit into a single line.
By default, this option is disabled.
Tip 1: You will also find this option via the context menu by right-clicking on a selected cell.
Tip 2: You can use the key combination Ctrl+↵ to wrap to the next line manually.
Vertical text
If this option is enabled, the cell content will be displayed vertically (top to bottom instead of left to right).
Merge cells
Lets you merge a cell with neighboring cells. To do so, select the cell and any number of directly adjacent cells and activate this option.
Merged cells are treated by PlanMaker as if they were one single cell.
Note: Whenever you merge cells, the content of all selected cells is automatically deleted – except for the cell in the upper left corner of the selected range.
To disconnect merged cells, select them again and disable this option.