On the ribbon tab Layout | group Page setup, you can, among other things, define the page format of a worksheet. This includes settings such as paper size and orientation (portrait or landscape).
Note: You can set up a different page format for each worksheet in a document. For example, within one document, the page orientation can be set to portrait in one worksheet, and landscape in another.
Applying via the dialog box of the command group "Page setup"
On the ribbon tab Layout | group Page setup, click on the group arrow![]() in the bottom right corner to open the dialog box and switch to the Page format tab.
in the bottom right corner to open the dialog box and switch to the Page format tab.
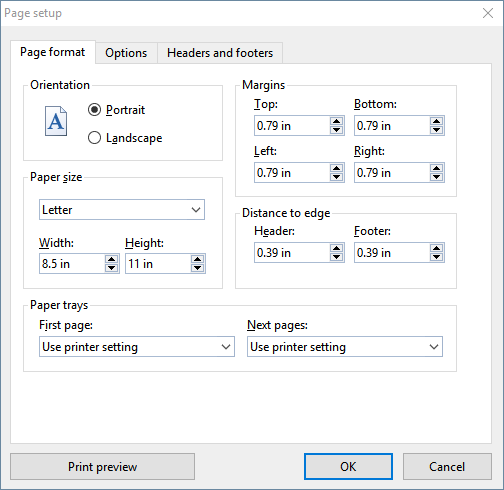
Then make the desired settings:
▪Orientation
| Here, you can specify the Orientation of the document on the printed page: Portrait or Landscape. |
▪Paper size
| Here, you specify the format of the paper size. The dropdown list Paper size contains all paper sizes that are supported by the current printer. If you want to specify a size that is not listed, you can do so by manually specifying values in the fields Width and Height. |
▪Margins
| You can set the page margins here |
▪Distance to edge
| Lets you modify the distance between headers/footers and the top/bottom edge of the page. |
| Note: Headers/footers are printed inside the top/bottom margins. If they do not appear on the printout, check if a) the Distance to edge is too large, or b) the top/bottom margin is too small. |
▪Paper trays
| Only available in Windows version: If your printer has multiple paper trays, you can set the tray which the printer should use. If you have selected the default setting Use printer setting, PlanMaker does not affect the paper feed. If, for example, you want the first page of your document to be printed on paper from tray 1 and the remaining pages on page from tray 2, you should change this setting accordingly. |
Tip: If you right-click at the bottom on a worksheet tab, you can use the Copy page setup context menu command to copy all made page settings from one worksheet to another. See also the Managing worksheets.
Applying via the icons of the command group "Page setup"
Common settings of the dialog box can also be found via the icons on the ribbon tab Layout | group Page setup. Click on the black arrow of the respective icon to open the corresponding dropdown menu.
|
|
Margins (corresponds to the options for Margins in the above dialog box): |
|---|---|---|
|
|
Page orientation (corresponds to the options for Orientation in the above dialog box): |
|
|
Page size (corresponds to the options for Paper size in the above dialog): |