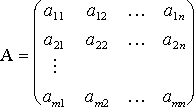
PlanMaker allows you to enter arrays (also known as matrices) in spreadsheets and perform calculations with them. An array is a rectangular table of numbers, structured as follows:

The entries a11 through amn are called the elements of array A. These are divided into m rows and n columns. This is why it is called an m by n array (or m x n array).
Entering arrays into cells
To enter an array in PlanMaker, distribute the array's rows and columns over the spreadsheet's rows and columns.
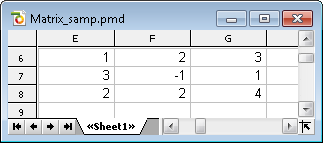
For example, the following array ...

... has to be entered as follows:

As you can see, each (rectangular) cell range can also be seen as a matrix – and vice versa. Accordingly, for arithmetic functions that expect a matrix as an argument, you can always specify a cell range that contains the elements of the matrix.
Entering array formulas
PlanMaker provides array functions that allow you to perform calculations with arrays. A formula containing an array function is called an array formula.
Since most array formulas return an entire array of values rather than a single value, entering array formulas differs from entering other formulas. Let's take a look at an example of this:
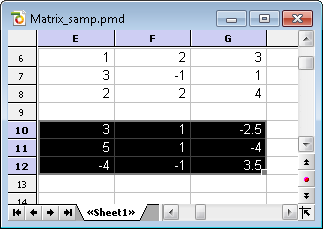
You want to determine the inverse of the 3x3 matrix shown above. To do so, proceed as follows:
| 1. | Select a cell range for the resulting array |
| Before entering the formula, you have to select the cell range where the resulting array should be placed. The inverse of a 3x3 array also has 3x3 elements. Therefore, you have to select a range of 3 by 3 cells – for example E10:G12. |
| 2. | Enter the array formula |
| Now enter the desired array formula. In our example this would be the formula =MINVERSE(E6:G8). |
| 3. | Ctrl+Shift+Enter |
| Important: To finalize the formula, do not press just Enter↵, but press the key combination Ctrl+Shift+↵. |
The cells E10:G12 now contain the resulting array, i.e., the inverse of the array in E6:G8:

Notes:
▪If you have selected a cell range larger than the resulting array, the error value #N/A ("not available") will be displayed in the superfluous cells. Important: If the selected cell range is too small, parts of the array will not be displayed.
▪To edit an existing array formula: Select all cells covered by the resulting array, edit the formula and press Ctrl+Shift+↵. If you press just the Enter↵ key instead, PlanMaker issues a warning and asks you if you want to overwrite the array.
▪Tip: To select all cells covered by an array formula, click any of the involved cells and press Ctrl+7.
Entering array constants in formulas
If desired, arrays can be entered as constants instead of cell references. For this purpose, surround the array by braces { }. Additionally, separate columns by commas and rows by semicolons.
For example, the following array ...

... can be entered as follows:
={1,2,3;3,-1,1;2,2,4}
Notes:
▪The notation described above is suitable for fixed values only; formulas and cell references are not allowed.
▪You can also enter vectors in the notation described above. For a horizontal vector enter, e.g., {1,2,3}; for a vertical vector enter {1;2;3}.