When you open a color list – for example, the color list for the font color – you see only a small selection of the up to 16 million colors available.
The first 30 colors in the color list are Standard colors that cannot be changed.
Colors from the Theme colors section are displayed below. You can change or modify the underlying color theme at any time (see "Selecting a different color theme" below).
Important: Changes to the color theme are saved in the document. This means that you can create a separate color theme for each document.
Furthermore, an additional Last used colors section is displayed in the color list as soon as you have used other colors in PlanMaker – regardless of whether they are standard colors or theme colors. Note: The last used colors are saved across all documents, which means that they are also available in the color list when you open a new document.
Finally, there is the User-defined colors section in the color list. This appears as soon as you have defined your own color with the entry More colors at the bottom (see next paragraph).
Applying user-defined colors
If you want to apply a user-defined color, proceed as follows:
| 1. | Select the entry More colors at the end of any color list (for example, font color). |
| 2. | In the following dialog box "Color definitions", specify the desired color. For more information, see next section "Working with the color controls". |
| 3. | Click on OK to confirm. |
The new color is now displayed in the color list in the User-defined colors section. From now on, this color will be available in all commands with color lists (for example, font color) or in dialog boxes where a color can be selected (for example, fill for objects).
Note: User-defined colors are not saved across documents, but only in the respective document in which they were used.
Working with the color controls
After you have selected the entry More colors from a color list, the dialog box "Color definitions" appears. The controls in the dialog box let you set colors in many ways. All these ways lead to the same result – just select your preferred method:
▪Using the color field and luminance slider
| The easiest way to set colors is to use the large color field and the luminance slider to its right. The color field presents all available hues in all available saturations, while the luminance slider next to it provides a means of varying the luminance. |
| To set a color, first click on the desired color in the large color field. Then click on the desired luminance in the luminance slider. |
▪Using the hue, saturation and luminance controls
| Alternatively, you can set colors with the controls labeled Hue, Sat (saturation) and Lum (luminance). Values between 0 and 240 are allowed. |
▪Using the Red, Green and Blue controls
| Colors can also be set via their red, green and blue components. The controls labeled Red, Green and Blue are provided for this purpose. Values between 0 and 255 are allowed. |
▪Typing the hex code for a color
| You can also specify a color by typing its hex code in the input field with the hash (pound) sign #. |
| Such hex codes are common in the HTML code of web pages, for example. The hex code consists of 3 two-digit hexadecimal values for the colors red, green and blue (RRGGBB). For example, 00FF00 represents pure green. |
Selecting a different color theme
Important: If you change the color theme, the colors for texts, objects, etc., that have been applied with colors from the Theme colors section will be adjusted to the new color theme.
As mentioned above, the Theme colors in color lists (e.g., for the font color) are based on the currently selected color theme. Color themes are a predefined set of matching colors for different parts of your document, such as text and lines, cell shading or other fill areas. By default, this is the color theme called "Office 2013-2022".
If you want to change the current color theme, proceed as follows:
| 1. | Choose the ribbon command Layout | group Page setup | Colors |
| 2. | A menu opens. At the top, you will see the current color theme (by default, "Office 2013-2022"). Below you will find more predefined color themes available. |
| 3. | Click on the desired color theme to assign it as the new basic theme for the Theme colors section in all color lists. |
Note: A change of color theme is not saved across all documents, but only in the respective document.
Editing color themes
It is also possible to edit the predefined color themes and customize them according to your individual needs. To do so, proceed as follows:
| 1. | Select a color theme from the menu of the command Colors |
| 2. | If you open the menu of the command again, you will now see the selected color theme listed at the very top as the currently active one. |
| 3. | Click on the pencil icon |
| 4. | The dialog box "Edit color theme" opens. |
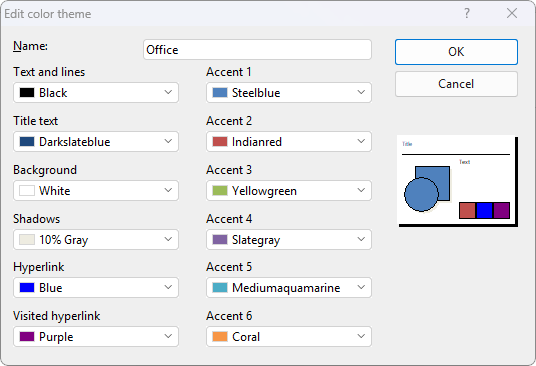 |
| 5. | You can now change the colors of the different elements as you like. To do so, open the corresponding dropdown list and select the desired color. The thumbnail in the bottom right corner of the dialog box shows the currently set colors. |
| The entry More colors at the end of the dropdown lists allows you to apply user-defined colors; see "Working with the color controls" above. |
| Tip: If you change the name in the Name field, the color theme is saved as a new custom theme. |
| 6. | Click on OK to confirm the changes to the color theme. |
Note: Changed color themes are only saved in the current document and are not available in other documents.
Creating custom color themes
You can create as many of your own color themes as you like. To do so, click on the plus icon ![]() to the right of the color theme in the menu of the command Colors
to the right of the color theme in the menu of the command Colors ![]() .
.
A copy of this color theme is now displayed at the end of the menu as Custom. You can then edit the copy as described in the previous section "Editing color themes" and save it under a custom name.