You can create numbered lists in Presentations just as easily as bulleted lists. Presentations automatically indents the paragraphs at the left to make room for the numbers and assigns a consecutive number to the paragraphs.
To number paragraphs, select the relevant paragraphs and proceed as follows:
Applying numbering
You will find the commands for numbering via the Numbering icon ![]() on the ribbon tab Home | group Paragraph.
on the ribbon tab Home | group Paragraph.
Numbering can be applied in different ways after you have selected the relevant paragraphs:
| A. | If you only want to apply a numbering without any further changes, simply click directly on the icon itself (not on the arrow next to it). The default numbering or the last numbering you selected will then be used. |
| B. | For a selection of predefined numbering options, click on the arrow next to the icon. A dropdown menu appears with default numbering and any numbering previously used in the document. Click on the desired numbering to insert it directly. |
| C. | If you want to adjust numbering via the dialog box with all additional options, however, click on the arrow next to the icon, and select Format numbering. For further steps in the dialog box, see "Other options: Via the dialog box Bullets and numbering" below. |
The selected paragraphs are now numbered.
Note: You can use as many numbered lists as you want within a document. The numbering automatically starts again for each group of contiguous paragraphs. More specifically: If there is an unnumbered paragraph in front of a numbered paragraph, the numbered paragraph's number is automatically reset to "1".
Skipping numbering
You can pause the numbering for a paragraph and then resume it for a subsequent paragraph.
To do so, place the text cursor in the relevant paragraph and choose one of the following paths:
| A. | Click on the arrow next to the icon |
| B. | To navigate via the dialog box, click on the arrow next to the icon, but now select Format numbering. In the following dialog box, enable the option Skip numbering. |
The selected paragraph's number has now been removed, and only its indentation is retained. The numbering resumes for the following paragraph.
Discontinuing or removing numbering
To discontinue numbering paragraphs or to remove a previously applied numbering, proceed as follows:
First, position the text cursor at the end of the last numbered paragraph and press Enter↵ to start a new paragraph. Alternatively: Select the numbered paragraphs if you want to completely remove the numbering of these paragraphs.
In this case also – as when applying numbering – different paths are possible:
| A. | Simply click again directly on the icon itself |
| B. | Alternatively, click on the arrow next to the icon and select None in the dropdown menu. |
| C. | To navigate via the dialog box, click on the arrow next to the icon, but now select the entry Format numbering. In the open dialog box, you will find the option None under Type. |
Other options: Via the dialog box "Bullets and numbering"
To insert custom numbering, you will find additional options in the dialog box.
Proceed as follows:
| 1. | Select the relevant paragraphs. |
| 2. | Click on the arrow next to the icon |
| 3. | In the following dialog box, select the option Numbering under Type. |
 |
| 4. | Make the desired settings for numbering if required. (For more information, see the "Options of the dialog box" section below.) |
| 5. | Confirm with OK. |
The selected paragraphs are now numbered.
Options of the dialog box
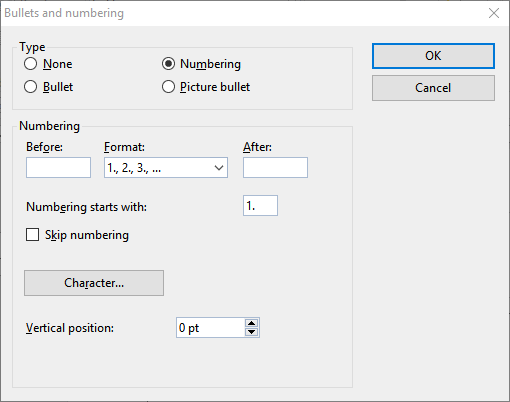
In the above dialog box, you can make the following settings for numbering:
▪Type
| Here, you can specify either numbering or bullets for the selected paragraphs. Select the Numbering option for numbering. |
| Note: You can always convert a numbered list into a bulleted list simply by changing the "Type" to Bullet. You can also do it the other way round, of course. |
| If you set the type to None, existing bullets or numbers are removed. |
▪Before and After
| If required, you can specify text to be added before and/or after the number assigned to the paragraph. If, for example, you want the numbers to be surrounded by dashes (-1-, -2-, -3- etc.), select the Format "1, 2, 3, ..." and enter "-" in the Before and After fields. |
▪Format
| Here, you specify the format for the numbering. In addition to the usual "1., 2., 3., ...", you can select letters (A, B, C, ...) or Roman numerals (I, II, III, ...). |
▪Numbering starts with ...
| Presentations starts every numbered list at "1" by default. If you want to use a different start value, enter "5" here, for example, and the numbering will start at "5". |
| Tip: Furthermore, you can also do the following: If, for example, you have set the numbering a, b, c, etc., for the above option Format and have entered the start value "aa", you create numbering like aa, bb, cc, etc. |
▪Skip numbering
| Within a numbered list, you often require one or more paragraphs for which the numbering is to be temporarily suspended but then resumed for the following paragraph. To do so, position the text cursor in the numbered paragraphs that you want to exclude from the numbering, and select the option Skip numbering. |
▪Character button
| You can click on this button to change the character formatting (font and font size, text styles, etc.) for the numbers. |
▪Vertical position
| This option allows you to specify the vertical position of the numbers. If the value is negative, the number is positioned lower. It is positioned higher if the value is positive. |