If you want to use the method via the dialog box to add an animation to an object, select the object and right-click on it to open the context menu and choose the command Animations.
Click on the Add button here...

...whereupon another dialog box appears with all available animations:
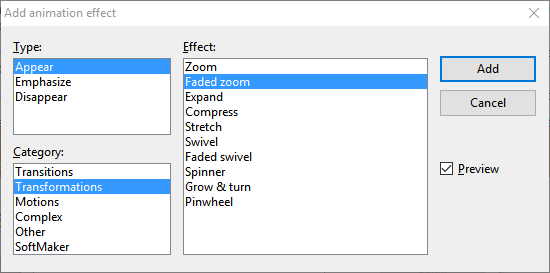
In the list Type, you can select the type of effect as follows:
▪Appear effects make an object fade onto the slide.
| Example: The object "flies" into the slide. |
▪Emphasize effects change the appearance of the object to emphasize it.
| Example: The object flashes briefly in a different color or size. |
▪Disappear effects make the object disappear from the slide.
| Example: The object "flies" out of the slide. |
For media objects (movies or sounds), one additional type named Media commands also appears with commands for playing, pausing or stopping the movie or sound.
Each of the effect types has a number of categories which are listed in the list Category. Each category, in turn, contains many effects that are listed in the list Effect.
To choose an effect, first select the Type, then the Category and finally the specific Effect.
If you have enabled the option Preview, you can view the animations directly in the slide while clicking on an effect in the dialog box. This enables you to quickly find a suitable effect.
Use the Add button to apply your selection.
Notes on using the SoftMaker effects
In the list of available effects, you will find a category named "SoftMaker". This category contains particularly impressive animations that use a graphics technology called OpenGL. The following restrictions apply when you use these effects:
▪The SoftMaker effects can be saved only in Presentations documents. When you save your presentation as a PowerPoint document, they will be replaced by simple fade effects.
▪When running a slide show, these effects can only be played accordingly in Presentations but not in Microsoft PowerPoint.
Changing and managing existing object animations
Once you have added animations to objects, you can subsequently edit them at any time.
Right-click on any object to open the context menu and choose the command Animations. The following dialog box shows all animations that are used on the current slide (see figure below).
Select the desired animation in the list, and then click on the Edit button. The program will display a dialog box in which numerous other settings can be made to "fine tune" the effect. For information on the individual options, see Animation properties in detail.
To remove an animation, select it in the list and click on the Delete button.
You can use the arrows to the right of the list to move animations up ![]() and down
and down ![]() in the list to change the order in which they appear on the slide.
in the list to change the order in which they appear on the slide.
To see what an animation looks like in the slide, simply select it and click on the Test button.
The dropdown list Sequence provides access to various animation sequences if you have defined any of them. (You can always create additional animation sequences, which are only accessed when you click on a specific object in the presentation. For more information, see Animation properties in detail.)
Meaning of the icons in the dialog box
For your information, the list of animations for each animation displays the name of the animated object, the animation effect used and its duration.

The icons to the left of them indicate when the animation starts during the slide show (see also the animation properties in the next section):
|
The animation starts after a mouse click. |
|
The animation starts after the previous animation. |
(No icon) |
The animation starts with the previous animation. |
The icons to the right of the start icons show the animation type:
|
Appear effect |
|
Emphasize effect |
|
Disappear effect |
For media objects, the following icons are also displayed:
|
Play media object |
|
Pause media object |
|
Stop media object |
Tip: Using the sidebar
Object animations can be applied even faster via the sidebar, which is displayed to the right of the slide.
To do so, click on the icon ![]() in the small toolbar above the sidebar. The sidebar then displays options for adding and editing object animations directly. Its use is basically similar to the dialog box described above.
in the small toolbar above the sidebar. The sidebar then displays options for adding and editing object animations directly. Its use is basically similar to the dialog box described above.
▪To add an animation to an object, select the object, click on the Add effect button in the sidebar and choose which type of effect to apply. Then choose the desired effect and click on the Add button.
▪To edit an existing animation, select it in the timeline and click on the Edit button.
▪The buttons with the up ![]() and down
and down ![]() arrows change the position of the animation that is currently selected in the timeline.
arrows change the position of the animation that is currently selected in the timeline.
▪The button ![]() deletes the selected animation.
deletes the selected animation.
▪In addition, the sidebar displays a timeline with bars that represent the duration and delay with respect to each animation. To change the timing of an animation, you can simply make the corresponding bar larger/smaller with the mouse or move it.
For more information on using the sidebar, see the previous section Applying object animations via the ribbon tab "Animation".