As previously mentioned, the placeholders in the content area of most slide layouts are already preformatted for the use of bullets. Thus, you can simply type your text next to the initial bullet. If you then press the Enter key↵, a new bullet is automatically created for the next line.
If you want to add or delete bullets or change existing bullets, select the relevant paragraphs and proceed as follows:
Adding bullets
You can find the commands for bullets via the icon ![]() on the ribbon tab Home | group Paragraph.
on the ribbon tab Home | group Paragraph.
Bullets can be added in different ways:
| A. | If you just want to add a bullet without any further selection, just click directly on the icon (not on the arrow next to it). The default bullet or the last bullet you selected will be inserted. |
| B. | For a manageable selection of predefined bullets, click on the arrow next to the icon. A dropdown menu appears with Default bullets, Custom bullets, Picture bullets, and any previously used In the document bullets. Click on the desired bullet to insert it directly. |
| C. | If you want to customize bullets via the dialog box with all additional options, click on the arrow next to the icon also, but select Format bullets. For the next steps in the dialog box, see the paragraph "Other options: Via the dialog box Bullets and numbering" below. |
Now type the text into the document. At the end of the paragraph, press the Enter key↵ to start a new paragraph. Presentations automatically indents the paragraph and adds a bullet.
Alternatively, you can also select existing text, of course, choose the command via one of the methods described above, and thus add a bullet to this text.
Ending a list or removing bullets
To end a list or remove existing bullets, proceed as follows:
First, position the text cursor at the end of the last numbered paragraph and press the Enter key↵ to start a new paragraph.
Alternatively: Select all paragraphs of the bulleted list if you want to completely remove the bullets for these paragraphs.
As with the addition of bullets, there are now also different ways here:
| A. | Simply click again directly on the icon itself |
| B. | Alternatively, click on the arrow next to the icon and select None in the dropdown menu. |
| C. | To navigate via the dialog box, click on the arrow next to the icon, but select Format bullets. In the following dialog box, you will find the option None under Type. |
Tip: If you want to wrap a new line in a list with bullets without creating a new bullet, simply insert a manual line break with the shortcut key Shift+↵. The next line will then appear as body text.
Promoting and demoting bullets
You can promote and demote the levels of bulleted list items by using the following icons on the ribbon tab Home | group Paragraph:
![]()
The demote and promote icons
The left icon demotes the list item to the level below its current level, while the right icon promotes the relevant item to the next higher list level.
Other options: Via the dialog box "Bullets and numbering"
To insert custom bullets, you will find additional options in the dialog box.
To do so, click on the arrow next to the icon ![]() on the ribbon tab Home | group Paragraph. In the dropdown menu, select Format bullets.
on the ribbon tab Home | group Paragraph. In the dropdown menu, select Format bullets.
The following dialog box is displayed...
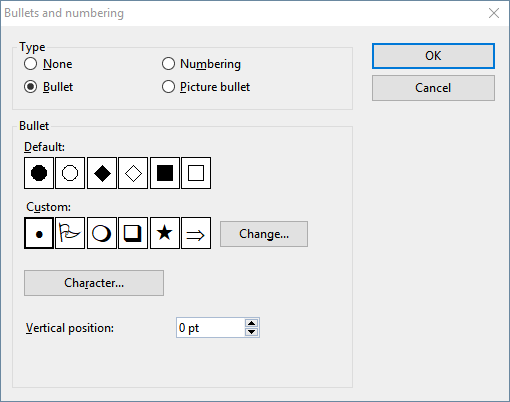
... in which you can make the following settings for bullets:
▪Type
| Here, you can specify whether the paragraphs should be given a Bullet, Picture bullet or Numbering. (For more information about the option Numbering, see Numbered lists below.) |
| Note: You can always convert a bulleted list into a numbered list by simply changing the "Type" to Numbering. You can also do it the other way round, of course. |
| When you set the type to None, existing bullets or numbers are removed. |
▪Default and Custom
| Here, you can select the bullet to be used. The Default row contains predefined bullets from which you can choose, and you can create your custom bullets in the Custom row (see below). |
▪Color (only for default bullets)
| You can select a different color for the bullet in the dropdown list Color. In addition to the colors offered here, you can define new colors at any time. For more information, see Document properties, Colors tab. |
Tip: If you set the color to "Auto", Presentations automatically uses the font color of the paragraph to the right of the bullet.
▪Size (only for default bullets)
| Here, you can change the size of the bullet (in points) if required. |
Tip: If you select the option "Auto" here, Presentations automatically uses the font size of the paragraph to the right of the bullet.
▪Character button (only for custom bullets)
| For custom bullets, the Character button appears instead of the two options above. Click on this button if you want to change the character format (font size, color, text styles, etc.) of the bullet. |
Tip: If you do not change these settings, the bullet automatically uses the character format of the paragraph to the right of the bullet (except for the font).
▪Vertical position
| This option allows you to specify the vertical position of the bullet on the line. If the value is negative, the bullet is positioned lower. It is positioned higher if the value is positive. |
Custom bullets
If you do not like any of the bullets offered in the above dialog box, you can use any other character as a bullet at any time.
In the middle of the dialog box, you will find two rows of bullets. The bullets in the Default row cannot be changed. However, the bullets in the Custom row can be changed at will.
To do so, proceed as follows:
| 1. | In the Custom row, click on the icon that you want to change. |
| 2. | Click on the Change button to the right of the row. |
| 3. | Presentations' character table is now displayed. First, set the desired font if necessary. |
| Tip for Windows users: Numerous characters suitable for bullets are included in the icon fonts Symbol and Wingdings. |
| 4. | Double-click on the desired character. |
| 5. | The selected character is now displayed in the list of available bullets. Click on OK to apply it. |
Note: The dialog box has a total of six buttons for custom bullets. Thus, you are not limited to six different types of bullets. The custom bullets can be redefined as often as you like – even within the same document.
Picture bullets
You can use picture bullets as an attractive alternative to traditional bullets. You can generally use any picture as a bullet, but Presentations already comes with a wide range of picture bullets in different shapes and colors.
To use picture bullets, select the option Picture bullet in the above dialog box. A preview of all available bullets will then appear. To select a bullet, click on it.
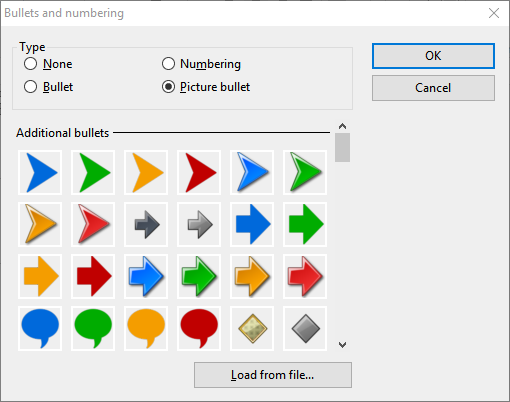
Alternatively, you can use any picture file from your hard disk as a bullet. To do so, click on the Load from file button.