To add additional cells to a table, proceed as follows:
Inserting rows
| 1. | Position the text cursor in the cell before or after which the new cells are to be inserted. |
| 2. | Choose the ribbon command Table | Insert rows |
| Alternatively, click on the icon's arrow and select exactly what you want to insert from the submenu: |
| Insert row above: inserts a row above the current cell |
| Insert row below: inserts a row below the current cell |
| Insert cells: displays a dialog box with additional options (see below) |
The rows or cells are now added to the table.
Note: If you have selected several rows, the following applies to the commands described above: The program will add as many rows as you selected previously. Furthermore, if you select several rows, the option Insert cells does not open a dialog box. Instead, the program inserts the selected number of rows directly below those selected.
Inserting columns
| 1. | Position the text cursor in the cell before or after which the new cells are to be inserted. |
| 2. | Choose the ribbon command Table | Insert columns |
| Alternatively, click on the icon's arrow and select exactly what you want to insert from the submenu: |
| Insert column left: inserts a column to the left of the current cell |
| Insert column right: inserts a column to the right of the current cell |
| Insert cells: displays a dialog box with additional options (see below) |
The rows or cells are now added to the table.
Note: If you have selected several columns, the following applies to the commands described above: The program will add as many columns as you selected previously. Furthermore, if more than one column is selected, the option Insert cells does not open a dialog box. Instead, the program inserts the selected number of columns directly to the right of those selected.
Options
If you select the option Insert cells when using the above procedure for rows or columns, the program displays a dialog box. Here, you can specify how the new cells are to be inserted.
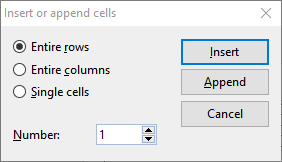
The dialog box provides the following options:
Option |
Explanation |
Entire rows |
Complete rows of cells are inserted. |
Entire columns |
Complete columns of cells are inserted. |
Single cells |
Individual cells are inserted. If, for example, you selected 4x4 cells before choosing the command, 4x4 cells will be inserted. |
In addition, the option Number allows you to specify the number of cells to be inserted. If, for example, you select the option Entire rows and then set the Number to 10, ten rows will be inserted instead of only one row.
Finally, click on Insert to insert the new cells before the current cell – or on Append to insert them after the current cell.
Tip: Appending an additional row quickly to the end of a table
You can also append an additional row to the end of a table by simply pressing the Tab key when the text cursor is in the last cell of the table. Presentations then automatically extends the table by adding a new row.