To insert a drawing, for example, a rectangle, proceed as follows:
| 1. | Choose the ribbon command Insert | group Objects | AutoShape  . Select the desired AutoShape – a rectangle in this case. . Select the desired AutoShape – a rectangle in this case. |
| 2. | Hold down the left mouse button and draw a frame of the desired size in the document. |
| 3. | The rectangle is now inserted. |
| You can then move or resize the rectangle: |
| To move the rectangle, click on it and (while still holding the mouse button down) drag it to the desired position. |
| To adjust its size, drag one of the round handles surrounding the rectangle. |
The application of drawings differs somewhat depending on the drawing tool used. The following is a list of all available drawing objects and information on how to handle them:
Note: You can adjust the shape of drawings retroactively at any time. For more information, see Editing shapes retroactively.
AutoShape
You can insert AutoShapes using the AutoShape tool. These are predefined shapes for various purposes – standard shapes such as rectangles, as well as symbols for flowcharts, stars, speech bubbles and many more.
As soon as you have selected an AutoShape, simply drag a frame of the desired size in the document while holding down the left mouse button. If you want, you can then move the AutoShape with the mouse or resize it by dragging one of the round handles at its corners.
Note: Additional handles  are displayed in some types of AutoShapes when they are selected. If you drag one of these handles, a parameter controlling the shape of the object is changed. For stars, for example, the length of the points can be changed, and for rounded rectangles, the rounding of the corners can be changed.
Tip: You can even enter text in an AutoShape – just like you can in a text frame. For more information, see Adding text to AutoShapes.
Lines and curves
Use the Lines tool  on the ribbon tab Insert to draw lines and curves.
When you click on this icon, a list of available line and curve tools opens. Select the desired tool and then use it as follows:
▪Lines
| You can use the tools at the top of the list to draw simple lines and arrows. After clicking on the desired tool, simply draw a line in the document while holding down the mouse button. |
| Tip: If you hold down the Shift keyñ, the line is limited to 45° angles. |
| Note: Arrows are nothing more than ordinary lines for which an arrowhead was selected in the object properties (Lines tab) by selecting the option Start point and/or End point. |
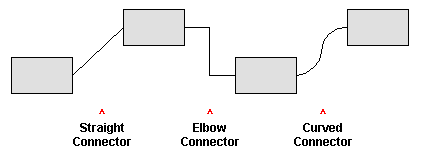
▪Connectors (straight, elbow and curved)
| You can use these tools to drag connectors between two objects. The difference between the three types of connectors can be seen in the following figure: |
| To do so, select one of these tools, and then drag the mouse cursor from one object to another while holding down the mouse button. When you move the mouse cursor over an object, small blue rectangles will appear at various points on the object. These show where the line can "dock" to the object. You can influence the course of curved and angled connectors by dragging the diamond handle via the mouse. |
| Tip: You can change the type of connectors retroactively at any time. Right-click on the line to open the context menu and choose between a straight, elbow or curved connector. Also available in the context menu: The option Create new connector causes the shortest connection between two objects. |
▪Curves
| The tools at the bottom of the list are used to draw curves: |
| You can use the Curve tool  to draw Bezier curves. to draw Bezier curves. |
| To do so, click on the starting point and then on any number of other positions. The curve "follows" your mouse clicks automatically. |
| If you let the curve end at its starting point, the drawing automatically becomes a closed curve. If, on the other hand, you want to obtain an open curve, you must end the drawing by double-clicking on it. |
| You can use the Freehand form tool  to draw curves in the same manner as if you were using a pencil. to draw curves in the same manner as if you were using a pencil. |
| To draw freehand, move the mouse to the desired starting point, press and hold the left mouse button and then start drawing as if using a pencil. Alternatively, you can release the mouse button and click on another location where a straight line will be drawn. |
| If you let the curve end at its starting point, the drawing automatically becomes a closed curve. If, on the other hand, you want to obtain an open curve, you must end the drawing by double-clicking on it. |
| Note: The small black points on the contour line of curves enable you to further adjust the shape. Use the mouse to drag such a point to another position. Further options can be found in the context menu by right-clicking on the curve. For more information, see Editing shapes retroactively. |
TextArt
You can insert TextArt objects using the TextArt object tool  on the ribbon tab Insert. TextArt objects are used to create text effects.
If you enable this tool, a dialog box appears. Enter your text in the dialog box and then click on Variants to select one of the predefined effects to be applied to the text. Then confirm with OK.
For information on the other options for TextArt objects, see Text tab.