To insert a table into a slide, use one of the following methods:
Inserting quickly via the grid
Tables with a limited number of rows/columns and without further adjustments can be inserted directly via the grid (the table can also be further adjusted at any time afterwards):
Click on the small arrow of the icon ![]() on the ribbon tab Insert | Table and move the mouse over the expanded grid. Above the grid, you will see how many rows and columns you are currently selecting.
on the ribbon tab Insert | Table and move the mouse over the expanded grid. Above the grid, you will see how many rows and columns you are currently selecting.
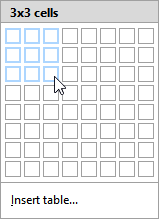
As soon as the table has the desired dimensions, click with the mouse into the grid and Presentations will insert the table into the document.
Inserting via the dialog box with additional options
If you want to insert a table with any number of rows/columns and also adjust the inner margins, select the method via the dialog box:
| 1. | Click on the icon itself |
| 2. | The program displays a dialog box in which you can specify the number of rows and columns the table should contain. |
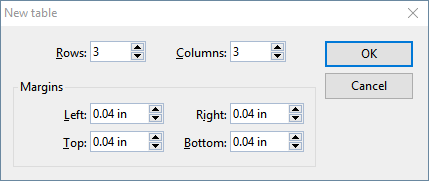 |
| In the section below, you can also specify the inner margins for the table cells if necessary. |
| 3. | If you confirm with OK, the table frame is inserted. |
| You can then move or resize the table frame: |
| Important: Click with the mouse on the border of the table frame in order to move it. While still holding the mouse button down, drag the text frame to the desired position. |
| To resize it, drag one of the handles surrounding the table frame. |
Of course, you can also subsequently move and resize tables at any time. However, remember that you must first select the table by clicking on its border.