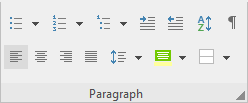
On the ribbon tab Home | group Paragraph, you will find the most frequently used commands for determining the formatting of paragraphs.

You can use the group icons to directly make the following settings:
▪Bulleted lists (or numbering)
▪Showing non-printable characters
Additional options: In the dialog box of the command group "Paragraph"
If you click on the group arrow![]() in the bottom right corner of the ribbon tab Home | group Paragraph, a dialog box opens with additional options for paragraph formatting:
in the bottom right corner of the ribbon tab Home | group Paragraph, a dialog box opens with additional options for paragraph formatting:
▪Spacing above/below a paragraph
▪Changing the_character format for whole paragraphs
▪Tabs
▪Hyphenation frequency (see Hyphenation)
▪Forcing a break before a paragraph (page break, column break)
▪Paragraph control (keeping certain paragraphs together, etc.)
More information can be found on the following pages.
Paragraph formatting always applies to complete paragraphs. Changes to paragraph formatting always affect the whole paragraph in which the text cursor is positioned. If you select multiple paragraphs, all selected paragraphs will be affected.
Changing the paragraph formatting
You can change the paragraph formatting in two different ways:
▪To subsequently change the paragraph formatting, select the relevant paragraphs and make the required changes via the icons or the dialog box.
▪To change the paragraph formatting as you type new text, use the icons or the dialog box to set the desired formatting without first selecting anything. The current paragraph is now reformatted accordingly. Furthermore, any new paragraph that you start with the Enter key↵ will be formatted in the same way until you change the paragraph formatting again.
Paragraph styles (for advanced users): You will find that paragraph styles can save you a considerable amount of the work involved in formatting paragraphs. You can use them to apply predefined formats to paragraphs very quickly. For more information, see Styles.
Units of measure: In TextMaker, dialog boxes not only accept values specified in the default unit of measure inches*, but they also accept them in other units of measure. To enter a value in specific units, simply add one of the following units of measure after the number:
Unit |
Explanation |
cm |
Centimeter |
in |
Inch – 1 in equals 2.54 cm. |
pt |
Point – 72 pt equal 1 in. |
pi |
Pica (character) – 1 pi equals 12 pt |
* The default unit of measure depends on your computer's regional settings (on Windows). For information on other operating systems, see Settings, Appearance tab.
If, for example, you type "7.62 cm" as the position for a tab, TextMaker puts it at 3 inches (7.62 cm).