You can adjust the auto correction settings according to your needs.
Note: Auto correction is a global setting. Changes you make here will thus be applied to every document.
To do so, choose the ribbon command Review | group Spelling | Auto correction ![]() , and the following dialog box will appear:
, and the following dialog box will appear:
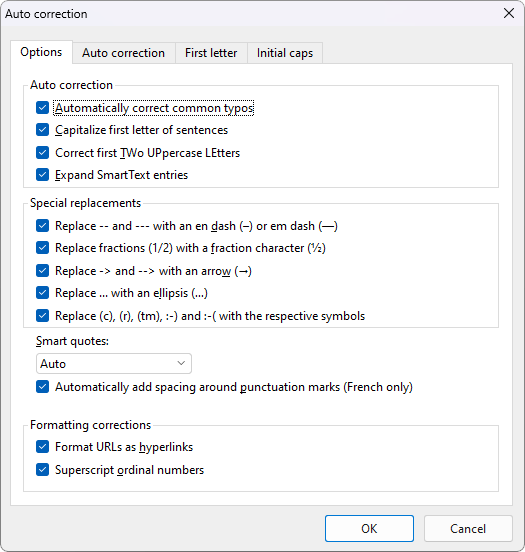
On the Options tab, you will find the following auto correction functions:
"Auto correction" section
▪Automatically correct common typos
| This option ensures that typical typing errors are corrected. If, for example, you type "thier", TextMaker automatically corrects this word to "their". |
| A list containing common typos is pre-installed for some languages. You will find this list on the Auto correction tab, where you can delete existing pairs of terms or add new ones. For more information, see Auto correction tab. |
▪Capitalize first letter of sentences
| If this option is enabled, TextMaker automatically capitalizes the first letter of every sentence you type – even if you accidentally enter a lowercase letter. |
| If, for example, you typed the sentence "this is a new sentence.", it would be corrected automatically to "This is a new sentence.". |
| Exception list: For certain terms, however, it may be undesirable for this automatic correction to occur (for example, after an abbreviation such as "max."). Switch to the First letter tab, where you can add terms that should be excluded from this correction. For more information, see First letter tab. |
▪Correct first TWo UPpercase LEtters
| If this option is enabled, TextMaker automatically corrects the case of words whose first two letters have been capitalized inadvertently. |
| If, for example, you typed the word "HEnry", it would be corrected automatically to "Henry". |
| Exception list: If, however, you want to exclude certain expressions from this correction (for example, "BSc"), then switch to the Initial caps tab. Here, you can add terms where two capital letters at the beginning should not be corrected. For more information, see Initial Caps tab. |
▪Expand SmartText entries
| As described in SmartText, you can create SmartText entries with TextMaker (for example, "br" for "Best regards"). |
| If this option is enabled, your SmartText entries can be directly expanded as the text is entered. To do so, simply type the abbreviation for the SmartText (for example, "br") and then a space, Enter↵ or a punctuation mark, and TextMaker will automatically replace the abbreviation with the SmartText content. |
| If this option is disabled, however, SmartText entries can only be inserted via the dialog box of the ribbon command Insert | group Text | SmartText. |
| Tip: The option "Expand SmartText entries" can also be enabled or disabled in this dialog box. |
"Special replacements" section
TextMaker can trigger some special characters automatically as soon as you type a certain combination of characters in your text. For example, three dots in a row ("...") are converted to ellipsis points. Enable or disable the desired options in this section.
Tip: On the ribbon tab Insert | group Text you can use the commands Character and Symbol to find other common characters and symbols that you can insert manually into your text.
Smart quotes
TextMaker can automatically convert double quotes (") and single quotes (') as they are typed to ensure that they are typographically correct for the selected language. Here, set the desired language or select "None" if you want TextMaker to leave your quote marks unchanged.
If, for example, you type "Text" or 'Text', the relevant setting will produce the following results:
Setting |
"Text" |
'Text' |
Auto* |
|
|
None (no change) |
"Text" |
'Text' |
German |
„Text“ |
‚Text‘ |
Swiss German |
»Text« |
›Text‹ |
English |
“Text” |
‘Text’ |
French** |
«Text» |
‹Text› |
Swedish |
”Text” |
’Text’ |
Polish |
„Text” |
‚Text’ |
* A special position is assumed by the option Auto: If you select this option, TextMaker automatically determines the language and converts the quotes accordingly. This means that either the default language specified on the Language tab in File | Options is used or the language specified on the Font tab in the dialog box of the command group Home | Character ![]() .
.
** For the single quote in the French setting, please note the following: the closing quote is first executed as an apostrophe ('). If you press the single quote on the keyboard once again, it will be converted into the single guillemet (›).
Tip: You can use the command Undo ![]() (or the key combination Ctrl+Z) to convert smart quotes into "neutral" quotes immediately after typing. The simple smart quote then becomes an apostrophe, while the double smart quote becomes a normal double quote.
(or the key combination Ctrl+Z) to convert smart quotes into "neutral" quotes immediately after typing. The simple smart quote then becomes an apostrophe, while the double smart quote becomes a normal double quote.
Automatically add spacing around punctuation marks (French only)
Enable the option to automatically add spaces both before punctuation marks : ; ! ? as well as between quotes « text » ‹ text ›. This option is only effective if French is the assigned language in the following settings:
▪In the dialog box of the command File | Options, Language tab: French
▪Also in the dialog box of the command group Home | Character![]() on the Font tab: French or Default
on the Font tab: French or Default
"Formatting corrections" section
▪Format URLs as hyperlinks
| If this option is enabled, URLs (web page addresses) are automatically formatted as hyperlinks immediately after entering them. |
| If, for example, you type "www.softmaker.de" in the text, it will automatically be converted into a clickable hyperlink and displayed accordingly (usually blue and underlined). |
▪Superscript ordinal numbers
| This option only supports the following languages: English, French, Italian, Portuguese and Spanish. |
| In these languages, superscripts are usually added to abbreviated ordinal numbers – for example 1st, 2nd, 3rd in the English language. |
| If this option is enabled, superscripts are added automatically whenever you enter such a number. If, for example, you type "2nd" in an English text and then press the space bar, it will be automatically reformatted as "2nd" – the "nd" will be converted into a superscript. |
Note: This option only works with text in one of the supported languages. For information on how to set the language of text, see Setting the language.