Text paragraphs can be provided with a complete border or individual border lines at the top, bottom, left or right.
You will find the commands for these options on the ribbon tab Home | group Paragraph.
Common borders and lines: Via the icon of the command group "Paragraph"
A selection of common borders and lines can be found via the icon Borders ![]() under Home | group Paragraph.
under Home | group Paragraph.
Proceed as follows:
| 1. | Place the text cursor in the desired paragraph (or select several paragraphs). |
| 2. | Click on the icon's arrow for the dropdown menu and select an entry with the desired properties by clicking on it. |
| Note: You can also combine individual lines to your liking by reopening the dropdown menu of the Borders icon and adding another attribute, for example, first positioning a line at the top and then an additional line at the bottom. |
The text paragraph is now provided with the relevant lines.
Tip: If you then want to add exactly the same type of border to other paragraphs, simply select them and click on the icon itself (not the arrow). TextMaker will then reapply the most recently selected type of border.
Removing borders/lines: Click on None in the dropdown menu. All borders/lines will then be completely removed.
If you want to edit/remove individual border lines or define additional properties for borders and lines, click on Borders in the dropdown menu. A dialog box opens with other options (see below).
Other options: Via the dialog box of the command group "Paragraph"
For additional options, such as the color or different thickness of lines, there are various options available in the dialog box.
You open the dialog box by clicking on the arrow of the icon ![]() and selecting Borders in the dropdown menu.
and selecting Borders in the dropdown menu.
Alternatively: On the ribbon tab Home | group Paragraph, click on the group arrow![]() and switch to the Borders tab.
and switch to the Borders tab.
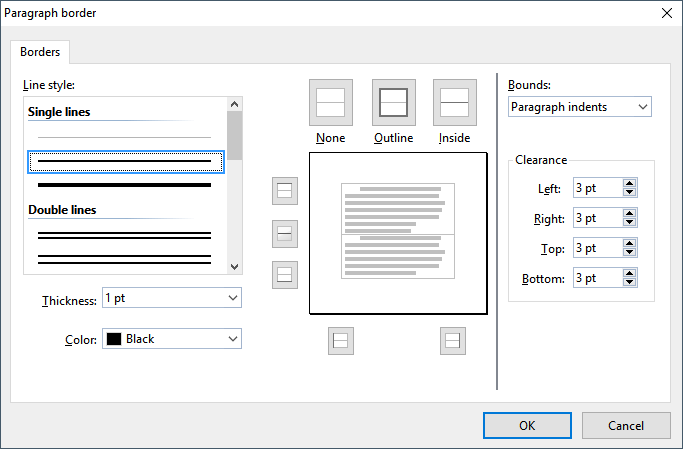
Dialog box for border lines (here: for text paragraphs)
A similar dialog box also appears for table cells. You use both dialog boxes in the same manner.
Essentially, you use this dialog box as follows:
| 1. | First, you specify what type of border line you want to apply (line style, thickness, color). |
| 2. | Then specify where this type of border line should be placed. To do so, simply click on the desired lines (or their buttons) in the right half of the dialog box. |
Let's take a closer look at the individual steps:
For example, to add border lines to a text paragraph, proceed as follows:
| 1. | Place the text cursor in the desired paragraph (or select several paragraphs). |
| 2. | On the ribbon tab Home | group Paragraph, click on the group arrow |
| 3. | First, specify what type of border line you want to apply. You have the following options: |
| Line style (single, double or dashed lines) |
| Thickness of the line |
| Color of the line |
| 4. | Then specify where you want to apply this type of border line (top, bottom, left, right, etc.). |
| For this purpose, a preview box surrounded by a set of buttons is available in the right half of the dialog box. Use it as follows: |
A.In the preview in the right half of the dialog box, simply click directly on all lines to which a border line is to be applied.
B.Alternatively, you can use the buttons that are displayed to the left and below the preview for this purpose. Each button represents a specific line (see icon on the button).
C.The buttons above the preview are useful shortcuts:
The Outline button applies the currently set border line to all outer borders.
The Inside button does the same for all inner lines (the "gridlines" between the cells).
The None button removes all lines at once.
| 5. | Add as many lines as you like by simply repeating step 4. |
| Of course, you can always change the line style, thickness or color (step 3) before applying it (step 4). |
| 6. | When everything is as required, confirm with OK. |
Detailed information on the individual options in this dialog box can be found below.
Editing or removing existing border lines in the dialog box
You can change the style, thickness or color of existing border lines or also remove them at any time. To do so, open the dialog box again and proceed as follows:
▪Changing: To change the appearance of a line, first select the desired settings (style, thickness, color). Then, in the preview, click on the line (or its button) to which you want to apply these settings.
▪Removing: To remove a border line, click on that line (or its button) twice in the preview. Clicking once applies the border line, while clicking it again removes it.
| Tip: The None button displayed above the preview removes all lines at once. |
Dialog box options (detailed)
In the dialog box for border lines described above, the following adjustments are possible:
▪Line style
| This option determines the type of line to be drawn. You can choose between different variations of single, double and dashed lines. |
▪Thickness
| This option determines the width of the line. |
▪Color
| Here, you can change the colors of the line. |
| In addition to the colors offered here, you can define new colors at any time. For more information, see Document properties, Colors tab. |
▪Preview box
| A preview box is displayed in the right half of the dialog box. This shows what the border lines would look like when applied after you exit the dialog box with OK. |
| The preview box is also used to apply and remove lines: |
| If you click on one of the lines in this preview, the corresponding line is enabled – or disabled when you click it again. The settings currently selected in the dialog box (line style, line thickness, color) are used for this purpose. |
| Alternatively, you can use the buttons to the left and below the preview for this purpose. Each button represents a specific line, which is indicated by the icon on the button. |
| The buttons shown above the preview are shortcuts: None removes all lines at once, Outline adds lines to all outer borders, Inside does the same for all inner lines (for example, for table cells). |
▪Bounds
| Only for text paragraphs: This option determines where the lines should start and end. |
| Page margins: The lines extend from the left page margin to the right page margin. |
| Paragraph indents: The lines extend from the left to the right indent of paragraphs. This is the default setting. |
| Text: The lines are as wide as the text they enclose. |
▪Clearance
| Only for text paragraphs: This option determines the distance from the border lines to the text. |