To create a new SQLite database (.sqlite), proceed as follows:
| 1. | Choose the ribbon command Mailings | group Database | New database |
| 2. | Select the entry "SQLite database" from the list Save as type in the file dialog. |
| 3. | Create your own file name, select a storage location and confirm saving it. |
| Note: If you want to create an additional table in an existing SQLite database, select the desired SQLite database to which you want to add the new table. |
| 4. | The following dialog box appears. If necessary, change the proposed table name. |
| 5. | Now create the first database field: |
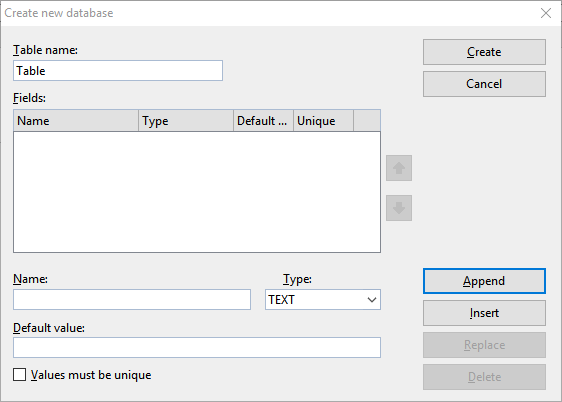 |
| Enter a unique name for the field under Name and select a suitable field type for Type. For more detailed explanations of the field types, see below. |
| Default value: If you want to create a new field that outputs a fixed value for all records, you must type this value here as the default value. As a result, each record contains the same content specified here for this field. |
| Values must be unique: If you enable this option, you specify that the record values for the relevant field may only occur once in all records. This is particularly useful if you want to assign a unique key (an ID) in a field for each record, for example, when creating customer numbers. |
| Tip: In the list Fields, you can read the selected information for each field. |
| 6. | Once you have made all the specifications for a field, click on Append to add the new field after the last field. If other fields are already defined, you can also click on Insert to insert the new field ahead of the current field. |
| 7. | Repeat steps 5 and 6 for each additional field to be included in the database. |
| Tip: If you make an error when specifying the field name, field type, etc., and only notice this fact after you have clicked on the Append button, you can go back and correct the error. Click on the relevant field in the list Fields, correct your entries below and click on Replace. You can also delete fields that were created incorrectly by choosing Delete. |
| 8. | When all desired fields have been entered, click on the Create button.| |
The database has now been created. You can now close the database or, if necessary, perform further steps on the open database in the database module. For more information, see Using the database module.
With the command Change structure ![]() in the database module, the structure of the created database can be changed retroactively at any time. For more information, see Changing the database structure.
in the database module, the structure of the created database can be changed retroactively at any time. For more information, see Changing the database structure.
Notes on the field type
The option Type in the above dialog box allows you to specify the field type of a field. This determines the type of data to be entered in the field. The following field types are possible:
Field type |
Allowed entries |
TEXT |
Text fields allow any type of input. |
REAL NUMBER |
Fields for (real) numbers only accept numbers as input, and even decimal numbers are allowed here. You can even perform calculations with the content of such fields. For more information, see Calculations in the text. |
INTEGER |
Fields for integers only accept numbers as input, and decimal numbers are not allowed here. As above, you can also perform calculations with it. |
LOGICAL |
Logical fields (Bool) are intended for Yes/No entries. The allowed entries are limited to Y for Yes or N for No. |
DATE |
Date fields are intended for dates. |
TIME |
Time fields are intended for times. |
DATETIME |
A combination of the Date and Time fields. |
LONG TEXT |
This field for long text behaves in a slightly different manner to "normal" fields. It allows any input and is intended for entering additional notes for a record. Several lines are also possible. Long text fields can only be viewed and edited in the database, as these types of fields cannot be inserted into documents or printed. |
BINARY |
Binary fields allow arbitrary, unstructured data objects, such as image files or programs |
Tip: For numbers such as phone numbers, zip codes, etc., select the "TEXT" field type. Here, numeric fields like "INTEGER" or "REAL NUMBER" are of no advantage – on the contrary: If you try to enter a phone number like "001-555-5555" in a numeric field, TextMaker will not allow the "-" because only numbers are allowed; furthermore, the leading zeros will be automatically removed.