To insert a field into the text, proceed as follows:
| 1. | Move the text cursor to the desired position. |
| 2. | Choose the ribbon command Insert | group Text | Field |
| Alternatively: Choose References | group Fields | Field or also Mailings | group Insert | Field. |
You can use the Field button to take two different paths:
Common options: Via the arrow of the "Field" button
For a pre-sorted selection of common fields, click on the black arrow on the Field icon and select a suitable entry directly from its dropdown menu (see below for an explanation of the fields).
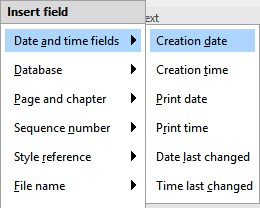
The field is displayed as a preview in the text if you hover over it in the dropdown menu and is inserted as soon as you click on the desired entry.
You will also find another entry in the dropdown menu: Calculation (not available in the dialog box below). This inserts a formula as a field in the text. For more information on this function, see Inserting calculations.
The dropdown menu also contains the entry More, which opens the following dialog box with additional options.
Additional options: Via the dialog box
You can also open the dialog box by clicking directly on the Field icon ![]() itself.
itself.
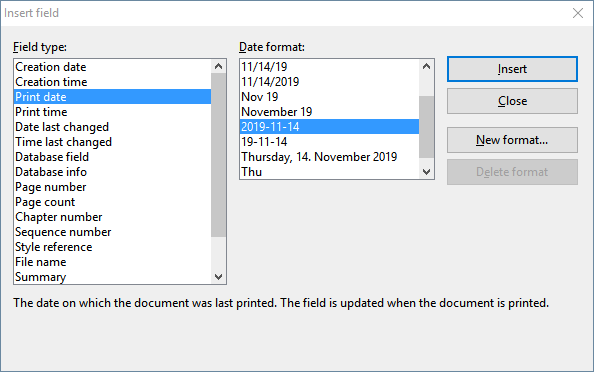
Select the type of field to be inserted from the Field type list.
You can then change the type or manner in which the field is displayed in the right half of the dialog box – in the figure here, for example, the format in which the print date should be output.
When you have made your selection, click on Insert.
The field is then inserted into the text and is displayed there. You usually see the result of the field immediately. Thus, if you insert, for example, the "Print date" field, the current date will be displayed in the text.
List of all available field types
The dialog box above contains the following field types:
▪Creation date
| The date on which the current document was created |
▪Creation time
| The time at which the current document was created |
▪Print date
| The current date. This field – like all field types – is updated automatically when you print the document. |
▪Print time
| The current time. This field is automatically updated when the document is printed. |
▪Date last changed
| The date on which the current document was last changed (that is, saved) |
▪Time last changed
| The time at which the current document was last changed (that is, saved) |
Note: For all of the above fields with date or time, you can also define the display format yourself via the New format button. For more information, see Defining your own date and time formats.
▪Database field
| The content of a field from a database that has been assigned to the document. The specific database field to be inserted is selected from the Field name list. For more information, see also Database. |
▪Database info
| The following information about the database assigned to the document: Database name only (file name of the database), Full database name (the file name of the database with the path name), Database record number (the record number of the current record) and Record count (number of records in the database). |
▪Page number
| The current page number, see Formatting page numbers |
▪Page count
| The total number of pages in the document |
▪Chapter number
| The number of the current chapter. For more information, see also Dividing a document into chapters. |
▪Sequence number
| The sequential number that is automatically inserted into captions. For more information, see Captions and tables of figures. |
▪Style reference
| You can use this field to search the document backwards for text in the selected style and then display that text. This allows you to display, for example, the current main heading (which is usually formatted in the paragraph style "Heading 1") in the text. For more information, see Style references. |
▪File name
| The file name of the current document, optionally with the complete path (for example, C:\Documents\Test.tmdx) or without the path (for example, Test.tmdx) |
▪Summary
| Information about the current document (Subject, Author, Keywords, etc.). You can edit the content of these fields by clicking on the Summary button. For more information, see also Document summary. |
▪Last edited by
| This field contains the name or initials of the user who last changed (that is, saved) the document. |
| To enter your name and initials, choose the ribbon command File | Options, switch to the General tab in the dialog box and click on the User info button. |
▪User info
| This field contains various personal details that can be edited via the User info button. |
| You can insert one of these fields in the text if you want your name, address, telephone number, etc. to appear in the document. These field types are used, for example, in the document templates supplied with the program. |
| Note: Alternatively, you can also edit your user info by choosing the ribbon command File | Options, switching to the General tab and clicking on the User info button. |
▪Auto number
| This field generates a sequential number. For more information, see Automatic numbering. |