On the ribbon tab Layout | group Page setup, you can define the page format of a document. Here, you can set such things as paper size, page orientation (portrait or landscape) and page margins.
Note: Changes to these settings always affect the whole document unless you divide it into chapters. Each chapter can have its own page formatting. You should divide the document into chapters if, for example, you want to change the paper size in the middle of the document. For more information, see Dividing a document into chapters.
Applying via the dialog box of the command group "Page setup"
On the ribbon tab Layout | group Page setup, click on the group arrow![]() in the lower right corner to open the dialog box and switch to the Page format tab.
in the lower right corner to open the dialog box and switch to the Page format tab.
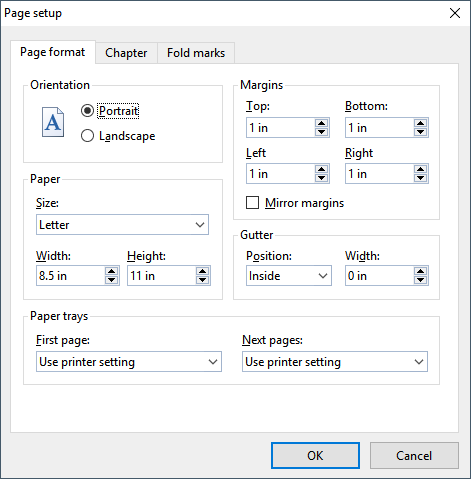
The following options are available in this dialog box:
▪Orientation
| Here, you can specify the Orientation of the document on the printed page: Portrait or Landscape. |
▪Paper
| You can specify the paper size for the printed pages here. The dropdown list Size contains all paper sizes that are supported by the current printer. If you want to specify a size that is not listed, you can do so by manually specifying values in the fields Width and Height. |
▪Margins
| You can set the page margins here |
▪Gutter
| A gutter can be added in addition to the page margins. You only need this option for documents with opposite pages (for example, books). The gutter is an additional margin that is required for the fold when such a document is printed and then bound or stapled together. |
| You can specify the position and size of the gutter. |
| If, for example, you select the "Inside" setting and set the gutter to 1 cm, all right pages of the book will have an additional 1-cm margin on the left side. On all left pages of the book, however, this margin will be opened on the right side. |
▪Paper trays
| Only available in Windows version: If your printer has multiple paper trays, you can set the tray which the printer should use. If you have selected the default setting Use printer setting, TextMaker does not affect the paper feed. If, for example, you want the first page of your document to be printed on paper from tray 1 and the remaining pages on page from tray 2, you should change this setting accordingly. |
There are also two more tabs in the dialog box "Page setup":
▪ Chapter tab
| This tab contains settings for the chapter format, which is discussed in Dividing a document into chapters). |
▪Fold marks tab
| On this tab, you can insert tri-fold marks and bi-fold marks at the beginning of each chapter. For more information, see Fold marks. |
Applying via the icons of the command group "Page setup"
Common settings of the dialog box can also be found via the icons on the ribbon tab Layout | group Page setup. Click on the black arrow of the respective icon to open the corresponding dropdown menu.
|
|
Margins (corresponds to the options for Margins in the above dialog box): |
|---|---|---|
|
|
Page orientation (corresponds to the options for Orientation in the above dialog box): |
|
|
Page size (corresponds to the options for Paper in the above dialog): |