Android/iOS: The command is not freely available in these versions. For more information, see the beginning of this chapter.
To print the current document, choose the ribbon command File | Print ![]() .
.
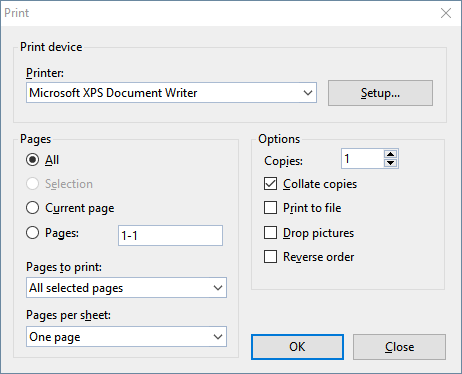
In the dialog box, you can make the following settings:
Printer
Here, select which of the installed printers should print the printout.
The Setup button opens a window for setting up and configuring the printer. For more information, see your printer manual.
Linux users can also specify here the command to be used to initiate the printing process.
Pages
Specify here the pages of the document to be printed:
▪All
| Print all pages of the document. |
▪Selection
| Print only the section that is currently selected. |
▪Current page
| Print only the page on which the text cursor is positioned. |
▪Pages
| Print only the specified pages. You must enter the desired page numbers, for example: |
12 |
Print page 12 only |
12-15 |
Print pages 12 to 15 |
12- |
Print page 12 and all of the following pages |
-12 |
Print pages 1 to 12 |
| You can also enter more than one such page number by separating them with commas: |
2-5, 12 |
Print pages 2 to 5 and page 12 |
etc. |
|
▪You can also use the option Pages to print to specify whether all selected pages or only the pages with a even or odd page number should be printed.
▪For Pages per sheet, you can specify how many pages to print on a sheet of paper. TextMaker usually prints only one page per sheet. However, you can instruct the program to output four pages (scaled down accordingly) per sheet at a time.
Options
This section of the dialog box contains additional printing options:
▪Copies
| Here, you can specify the number of copies of the document to be printed. |
▪Collate copies
| This option specifies whether to sort the print output by page number when printing multiple copies of a document. |
| If you enable this option and print multiple copies of a document with, for example, three pages, the pages will be output in the following order: 1-2-3, 1-2-3, 1-2-3, and so on. |
| If it is not enabled, the order will be: 1-1-1..., 2-2-2..., 3-3-3... |
| Note: Not all printers support this feature. |
▪Print to file
| This option redirects the print output to a file instead of a physical printer. |
▪Drop pictures
| This option skips all pictures and drawings when printing (useful for fast test printouts). |
▪Reverse order
| This option prints the pages from last to first. |
To start printing, click on OK.
Tip: Before actually printing a document, you can preview the printout via the ribbon command File | Print preview. This feature enables you to avoid wasting paper on test prints.