To obtain a better overview of the structure of a document in the outline view, it is a good idea to hide the normal text so that only the headings are visible. In addition, you can also hide headings below a specific level.
For this purpose, the ribbon tab Outline has the following two elements:
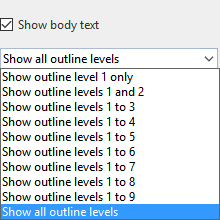
▪The option Show body text above the dropdown list is particularly useful. It determines whether only headings or both headings and the associated text should be displayed. You can enable or disable this option by clicking on the checkbox. If it is enabled, the text is displayed. If it is disabled, only the headings remain visible.
Tip: You can also use the shortcut keys Alt+Shift+A to enable or disable the text display instead of using the checkbox.
▪You can use the dropdown list below to specify which outline levels are to be displayed. By clicking on the entry Show outline level 1 only, you ensure that only the main headings are visible. By clicking on the entry Show outline levels 1 to 3, you ensure that all headings up to and including level 3 are displayed, etc.
Tip: Instead of the entries for the outline levels 1 to 9, you can also use the shortcut keys Alt+Shift+1 to Alt+Shift+9.
| By default, the All button is enabled; thus, TextMaker displays headings of all levels. |