On the View tab in the dialog box of the ribbon command File | Options ![]() , you can make settings for the appearance of documents on the screen:
, you can make settings for the appearance of documents on the screen:
Document window section
Here, you can select the tools to be displayed in document windows:
▪Table guidelines
| Here, you specify whether or not a grid of gray guidelines should be displayed between the cells of tables. These lines are only for your orientation on the screen. They are not printed. |
| This option is enabled by default. |
▪Frame guidelines
| Here, you specify whether or not gray guidelines should be used to make the boundaries of text frames visible. These lines are only intended to reflect the position and size of the text frame on the screen. They are not printed. |
| By default, this option is enabled. |
▪OLE object guidelines
| Windows only: Here, you specify whether or not gray guidelines should be used to make the boundaries of OLE objects visible. These lines are only intended to reflect the position and size of the object on the screen. They are not printed. |
| By default, this option is enabled. |
▪Guides
| As described in Using guides, you can set up guides in a document to simplify the flush positioning of objects. |
| With this option, you specify whether or not these guides should be displayed on the screen. |
| By default, this option is enabled. (Note: If you disable this option, the guides will become invisible but will retain their function.) |
Tip: You will also find this option directly in the dropdown menu of the Grid and guides icon ![]() on the ribbon tab View (in the group View).
on the ribbon tab View (in the group View).
▪Page margins
| Here, you specify whether or not the page margins should appear as dotted lines in the document. These lines are only intended for orientation on the screen. They are not printed. |
| By default, this option is enabled. |
▪Horizontal ruler
| Here, you can enable or disable the horizontal ruler. |
| The horizontal ruler is displayed above the text and is usually called the ruler in this manual. It not only displays the current paragraph formatting, but it also lets you change indents and tabs with the mouse. For more information, see Paragraph formatting: Indents. |
| By default, this ruler is enabled. |
Tip: The horizontal ![]() and vertical rulers
and vertical rulers ![]() can also be enabled and disabled directly on the ribbon tab View (in the group View).
can also be enabled and disabled directly on the ribbon tab View (in the group View).
▪Vertical ruler
| Here, you can enable or disable the vertical ruler. |
| The vertical ruler is displayed to the left of the text. It is for informational purposes only and does not allow formatting changes. |
| By default, this ruler is disabled. |
▪Overflow mark
| If this option is enabled, TextMaker displays a red bar at the bottom of text frames whenever there is too much text to be fit completely into the frame. |
| Note: The red bar will appear only if the object Height is set to Fixed or Growing (Max value) on the "Format" tab of Object properties and the defined limit has been reached. |
Show non-printable characters section
Here, you specify whether to display icons for paragraph marks, tabs, spaces, etc., in the text, so that they are more recognizable.
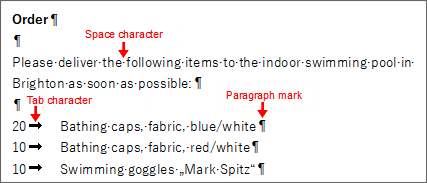
The markers for paragraphs, tabs and spaces have been enabled here
▪Paragraph marks
| If you enable this option, TextMaker displays a paragraph mark at the end of each paragraph. This is represented by the icon ¶. This lets you see exactly where paragraphs end. |
▪Tabs
| If you enable this option, all tabs will be identified by small arrows on the screen. |
▪Spaces
| If you enable this option, all spaces on the screen will be identified by small dots. |
▪Soft hyphens
| If you enable this option, all soft hyphens will become visible on the screen and will be displayed as hyphens with a gray background. |
▪All
| This option enables all of the above options together. |
| Note: If you choose the ribbon tab Home | group Paragraph and enable the Paragraph marks icon |
Show scrollbars section
Here, you can specify whether to display a horizontal and/or vertical scrollbar for the document.
Wrap text to window (in continuous and outline view)
If this option is enabled, the lines of text are wrapped at the right edge of the document window, regardless of their actual width. You won't see the actual layout of the document, but it will be easier to read the text on devices with a small display (without having to constantly scroll left and right).
Note: Enabling this option only affects the continuous and outline views (ribbon command View | Continuous or Outline).
In standard view (ribbon command View | Standard), it has no effect.
Show multiple pages side by side
With this option, you can specify if TextMaker should display multiple pages of a document side by side when the document is viewed at a very low zoom level:
▪Enabled: As many pages as possible are displayed side by side. This allows you to view multiple pages at the same time.
▪Disabled: The pages are never displayed side by side but only beneath one another.