TextMaker offers you many options for determining the zoom level at which a document should be displayed on the screen.
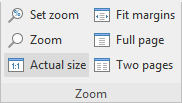
The command group "Zoom" on the ribbon tab View
Use the following commands of the ribbon tab View | group Zoom for this purpose:
Command |
Function |
Set zoom |
This option allows you to select the zoom level from a list. You can also enter a value manually (for example, "125" for a zoom level of 125%). |
Zoom |
This command enables the magnifying glass. Then use the mouse to drag a frame around any section of the document to enlarge it. |
Actual size |
This command sets the zoom level to 100%. This is the default setting. |
Fit margins |
This command automatically sets the zoom level so that the page width fits exactly in the document window (including comments and text frames). |
Text width |
This command automatically sets the zoom level at which the width of the text area fits exactly into the document window (without comments and text frames). |
|
Note: The command "Text width" is not available as a default button on the ribbon. However, you can choose the command via the Set zoom button (see above) or add it to the ribbon as a separate button. For more information, see Customizing icons and groups in the ribbon). |
Full page |
This command displays one full page of the document. |
Two pages |
This command displays two full pages next to each other. |
Using the zoom slider
You can also use the zoom slider in the bottom right corner of the screen to change the zoom level:
![]()
To change the zoom level, either drag the slider with your mouse or click on the plus or minus icon.
If you click on the percentage to the right of the zoom slider, you open the dialog box of the aforementioned command View | group Zoom | Set zoom.
Tip: Also note the key combination Ctrl+middle mouse wheel for continuous zooming.