You can use the Fill function to copy the contents of one cell to other cells in an instant or to create an increasing or decreasing number series across several cells based on this cell content.
There are two ways to use this function:
Filling with the mouse
The easiest way to fill cells automatically is via the mouse. Proceed as follows:
| 1. | Enter the initial value in a cell. |
| 2. | Click on that cell (to make it the currently selected cell). |
| 3. | Hover over the small square in the bottom right corner of the cell frame that surrounds the current cell (outlined in red in the figure): |
| 4. | Drag this square in the desired direction while holding down the mouse button. Release the mouse button when the target position has been reached. |
All cells in the selected area have now been filled automatically.
What the cells are filled with depends on the content of the initial cell:
▪If the initial cell contains text, PlanMaker will fill all cells with this text.
▪If the initial cell contains a number (e.g., 42), PlanMaker will fill successive cells with incrementing values (in this case, 43, 44, 45, etc.).
Tip 1: If you do not want PlanMaker to fill the cells with a series of numbers but just want to have all cells filled with 42, press and hold down the Ctrl key while dragging with the mouse.
Tip 2: By double-clicking on the small square, you can also fill a series if there are values in the column to the left of it. The series then expands to the end of the values in the column to the left of it. In this case, too, you can use the Ctrl key to fill the series with the same values.
If you press and hold down the Alt key while dragging, the program will display the following dialog box in which you can specify exactly how the cells should be filled.
Filling via buttons/dialog box
To fill cells automatically via buttons/dialog box, proceed as follows:
| 1. | Enter the initial value in a cell. |
| 2. | Select the cell with this initial value and all cells that you want to fill. |
| 3. | Choose the ribbon command Home | group Contents | Fill  . . |
| 4. | In the dropdown menu, specify the fill direction (starting from the cell with the initial value and moving in the direction of the selected cells): Down, Right, Up or Left. |
| As soon as you have selected a direction, the corresponding cells are filled with the initial value (copied as value and format but not incremented). |
| 5. | If you want to make further settings (for example, increment values instead of copying them), select the entry Series in the dropdown menu to open the dialog box. Here, you can specify exactly how the cells should be filled (see below). |
| As soon as you confirm with OK in the dialog box, the selected cells are filled according to your settings. |
In the dialog box, you can make the following settings:
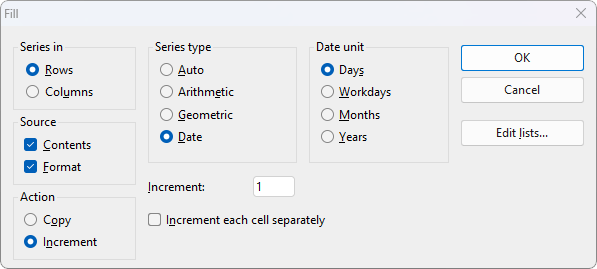
▪Series in
| Here, select whether to fill in the direction of the rows (to the right) or in the direction of the columns (downwards). |
| Note: If you have selected only one row or only one column, this option is omitted and PlanMaker automatically presets rows or columns. |
▪Source
| Enable the option Contents if you want the cells to be filled with values. |
| Enable the option Format if you also want the formatting of the source cell to be applied to the new cells. |
| Both options are enabled by default. |
▪Action
| This option corresponds to pressing the Ctrl key when filling cells with the mouse. It lets you determine whether to copy values or to increment them from cell to cell: |
| If, for example, the initial cell contains 42 and you select Copy, all cells will be filled with 42. |
| If you select Increment, successive cells will be filled with a series of numbers (in this case, 43, 44, 45, etc.). |
| The numeric increment can be specified using the other options in this dialog box: |
▪Series type
| Here, you specify how the number series is to continue: |
| This option corresponds to an arithmetic series: Each additional value will be increased by the increment. However, PlanMaker determines the increment automatically. |
| If, for example, you continue two cells with the values 10 and 20, the next cells will be filled with 30, 40, 50, etc. For more information, see Tips and tricks in the next section. |
| Here, each additional value will be increased by the increment. |
| If, for example, the initial cell contains 1 and you specify an increment of 2, the following cells will be filled with 3, 5, 7, 9, 11, etc. |
| Here, each additional value will be multiplied by the increment. |
| If, for example, the initial cell contains 1 and you specify an increment of 2, the following cells will be filled with 2, 4, 8, 16, 32, etc. |
| Here, each additional value in the selected Date unit (see below) will be increased by the specified increment. This type of series is only useful if the initial cell contains a date. |
| If, for example, the initial cell contains the date 1/1/2018, the Increment is set to 1 and the Date unit is set to "Months", the new cells will be filled with 2/1/2018, 3/1/2018, 4/1/2018, etc. |
▪Date unit
| This option is only available if the Series type is set to "Date". |
| It allows you to specify the date unit of the increment: |
| Workdays: increment by days, excluding Saturdays and Sundays. If, for example, the initial value is a Friday, the next value would be the Monday (not Saturday). |
| Months: increment by months |
| Years: increment by years |
▪Increment
| Here, you specify the amount by which each value will increase from cell to cell. See above for examples. |
| Positive or negative increment values can be used. |
| This option is not available if the Series type is set to "Auto", as PlanMaker automatically determines the increment in this case. |
▪Increment each cell separately
| When this option is enabled, the specified increment will be added to each of the currently selected cells individually. |
| You select three cells containing the values 1, 2, 3, and try to fill the cells below them. |
| If this option is disabled, this sequence is simply continued and the cells are filled as follows: 4, 5, 6, 7, 8, 9, 10, 11, 12, etc. |
| If you enable this option, the cells are filled as follows: 2, 3, 4, then 3, 4, 5, then 4, 5, 6, etc. |
▪Edit lists button
| You can also create your own lists for the Fill function. |
| If, for example, you create a list with the content "Red", "Green" and "Blue", and then subsequently start a fill operation from a cell that contains the text "Red", PlanMaker will continue the series and fill with Green, Blue, Red, Green, Blue, etc. |
Tips and tricks for automatic filling
The many options that are available for the Fill function make its application seem more difficult than is actually the case. This section offers some tips and tricks on how to use this extremely useful feature most effectively.
Tip: The quickest way to fill a range of cells is to use the mouse to drag the small rectangle in the bottom right corner of a cell in the appropriate direction. PlanMaker then sets the series type to "Auto". This means it will automatically determine which values to use to fill the cells (see following examples).
▪Filling with text
| When filling with text, you do not need to worry about any options, as text can only be copied anyway. |
| If you want to fill multiple cells with the same text, simply enter it into a cell, click on that cell, and then drag the small rectangle in the bottom right corner of the cell frame over the cells you want to fill with it. |
▪Filling with numbers
| If you use the mouse to fill cells with numbers, PlanMaker will automatically determine the increment. |
| If, for example, you drag the small rectangle from a cell with 42, the other cells will be filled with the values 43, 44, 45, etc. |
| If the initial cell value is 10 and the cell value below it is 20, and you select both cells and drag the small rectangle downwards, PlanMaker automatically recognizes how to continue this series and fills the other cells with 30, 40, 50, etc. |
▪Filling with formulas
| If you use the mouse to fill cells with formulas, PlanMaker automatically attempts to update the formulas in the new cells with incremented cell addresses. |
| For example, the formula =A1*2 in the initial cell will be updated to =A2*2, =A3*2, etc., in the other cells. |
▪Filling with dates
| Filling with dates is identical to filling with numbers: |
| Enter the start date in the initial cell and drag the small rectangle over the desired cells. PlanMaker will add one day to each additional cell. |
| If necessary, you can use the ribbon command Home | group Contents | Fill | Series to specify via the dialog box whether to increment by days, months or years. |
▪Filling with structures
| As you have already learned, you can also select multiple cells and continue them. What if the selected cells have no automatically recognizable increment or completely different values? |
| In this case, PlanMaker will attempt to find a pattern within these values. If, for example, you enter the values 1, 2, text, PlanMaker will continue the series with 3, 4, text, 5, 6, text, 7, 8, text, etc. |
| If the values are solely strings, they will be simply repeated. If the initial cells are filled with Red, Green, Blue, the following cells will be filled with Red, Green, Blue, Red, Green, Blue, etc. |
▪Filling with custom lists
| If you choose the ribbon command Home | group Contents | Fill | Series, you can create your own lists for the Fill function using the Edit lists button in the dialog box that opens. |
| If, for example, you create a list with the content "Red", "Green" and "Blue", and then subsequently start a fill operation from a cell that contains the text "Red", PlanMaker will continue the series and fill with Green, Blue, Red, Green, Blue, etc. |
| Note: If necessary, you can also add a separate Edit lists button for direct access to a ribbon tab. For more information on this topic and all other information on creating your own lists, see Editing lists for automatic filling. |