This feature is only included in SoftMaker Office Professional and NX Universal.
In the Android/iOS version, the command is locked. (To unlock the command, see Welcome.)
After choosing the ribbon command Insert | QR code/Barcode frame ![]() , an additional input mask for creating an EPC QR code is available for the type Multiple line QR code. You can enter the data for a bank transfer in this input mask and generate a multiple-line QR code that can be scanned by a banking app.
, an additional input mask for creating an EPC QR code is available for the type Multiple line QR code. You can enter the data for a bank transfer in this input mask and generate a multiple-line QR code that can be scanned by a banking app.
This saves some of the effort that would be required to enter the data manually into the banking app.
Application example:
You regularly send out invoices with your bank transfer details. If you create the transfer data as an EPC QR code, the invoice recipient can scan this QR code in his banking app and execute the order in just a few steps.
To generate an EPC QR code, proceed as follows:
| 1. | Choose the ribbon command Insert | group Objects | QR code/Barcode frame |
| 2. | In the dialog box that appears, select Multiple line QR code as the type. |
| 3. | Click on the EPC button to open the following input mask: |
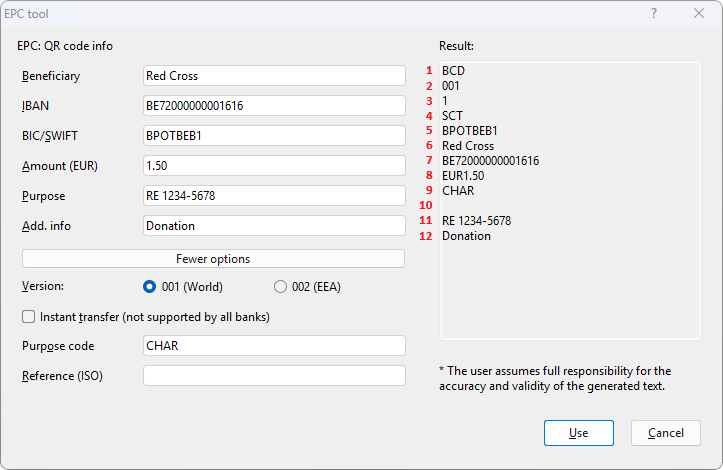 |
| 4. | On the left side, enter the transfer details. On the right side, you will see the result of your entries – in the correct form and sequence for scanning the multiple-line EPC QR code. |
| If you click on the More options button, you will find more input fields. However, it is usually sufficient to just use the fields that are located above the button. |
| Note: Not all fields must be filled in, as there are fields with optional entries (see table below). In addition, the top two entries that you see in the "Result" list on the right are preset by PlanMaker and thus do not need to be entered in the mask. |
| Explanations of the input fields and their position in the 12-line result can be found in the "Scheme of the EPC QR code" table below. |
| 5. | Once you have entered all the data, click on the Use button. Your data will be used to generate the QR code and you can complete the creation in the main window. |
| Note: If mandatory fields are missing or incorrect, PlanMaker will ask whether you would like to correct the entered data or accept it as it is. |
Important: SoftMaker Office cannot guarantee a comprehensive check of the validity of the entered data; this check must be performed by the relevant banking app in use.
Scheme of the EPC QR code
The multiple-line text for an EPC QR code can only be scanned by the banking app in a predefined format. On the right side of the PlanMaker input mask, you can already see the result of the data in the correct form and sequence for scanning a multiple-line EPC QR code.
The following table shows the meaning of the input fields and the corresponding line in the result:
Field |
|
Explanation |
|
Line |
|---|---|---|---|---|
Beneficiary |
|
Mandatory information. Enter the name of the recipient. |
|
6 |
IBAN |
|
Mandatory information. Enter the recipient's account number as the IBAN. |
|
7 |
BIC/SWIFT |
|
BIC or SWIFT of the recipient. Is mandatory information if line 2 has the value 001. Is optional if line 2 has the value 002. |
|
5 |
Amount |
|
Optional, but recommended. Enter the payment amount of the transfer. |
|
8 |
Purpose |
|
Optional. The purpose of the transfer as unstructured text with max. 140 characters. If line 11 is used, line 10 must remain empty. |
|
11 |
Add. info |
|
Optional. Here, you can enter further information for the recipient, max. 70 characters. |
|
12 |
More options: |
|
|
|
|
Version |
|
Mandatory information. Is preset by PlanMaker to 001. 001 = EEA (European Economic Area) with non-EEA countries; BIC in line 5 is mandatory. 002 = EEA only; BIC in line 5 is optional. |
|
2 |
Instant transfer |
|
Mandatory information. Is preset by PlanMaker to SCT. SCT = SEPA Credit Transfer (no real-time transfer) INST = SEPA Instant Credit Transfer (real-time transfer) |
|
4 |
Purpose code |
|
Optional. Defined SEPA purpose codes that specify the purpose of a payment as a text key with up to four digits. |
|
9 |
Reference (ISO) |
|
Optional. Structured character code (SCOR reference) with max. 25 characters, e.g., RF18539007547034. Always starts with RF and 18 is the checksum in this example. If line 10 is used, line 11 must remain empty. |
|
10 |
without input field: |
|
|
|
|
Service Tag |
|
Mandatory information. Is assigned automatically by PlanMaker. Fixed value = BCD |
|
1 |
Character set |
|
Mandatory information. Is assigned automatically by PlanMaker. Fixed value = 1 (UTF-8) |
|
3 |