In the Android/iOS version, the command is locked. (To unlock the command, see Welcome.)
To print the current document, choose the command File | Print ![]() .
.
The following dialog box appears:
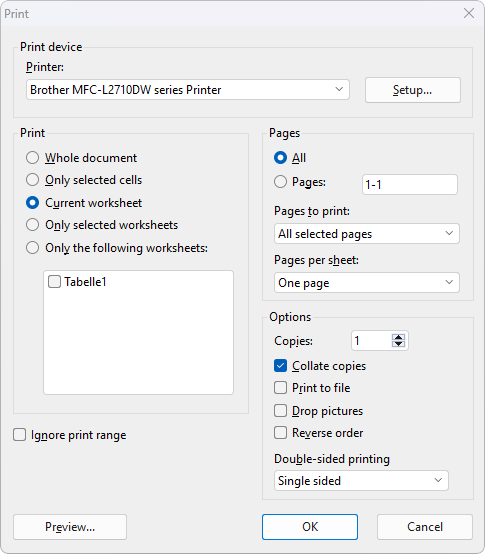
Before you actually print anything, you can check the print preview on the right side of the dialog box. This feature enables you to avoid wasting paper on test prints. For more information on using this feature, see "Print preview" below.
Note: Changes you make in the above print dialog box are applied directly to the document and are retained, even if you close the dialog box without printing.
You can make the following settings on the left side of the dialog box:
Printer
Here, select which of the installed printers should print the printout.
The Setup button opens a window for setting up and configuring the printer. For more information, see your printer manual.
Linux users can also specify here the command to be used to initiate the printing process. Note: If pictures do not print correctly (this depends on the printer), there is an additional option in the printer properties called "Emulate picture transparency". Enabling this option should resolve the issue.
MacOS and iOS users select the printer including its setup via the Print button.
Selecting the parts of the document to be printed
In this dropdown menu, you can specify which parts of the document should be printed:
▪Print active sheet
| Print only the current worksheet. |
▪Print selected sheets
| Print only those worksheets that are currently selected in the worksheet register. |
▪Print workbook
| Print the entire document (all worksheets). |
▪Print selection
| Print only those cells that are currently selected in the current worksheet. |
▪Print custom sheet list
| Print only the selected worksheets. To select them, use the list to the right of this option. Click to seta check mark in front of each worksheet that you want to print. |
▪Ignore print range
| If you enable this option, PlanMaker will ignore all print ranges defined in the document when printing. |
| Background information: You can define a print range for each worksheet in a document if required. When a print range is defined, only those cells that are within this cell range will appear in printouts. The rest of the sheet will be omitted. |
| You can temporarily disable this feature at any time by enabling this option. |
| For more information on print ranges, see Setting page format options. |
Pages
Specify here the pages of the document to be printed:
▪All pages: Print all pages of the document.
▪Pages: Print only the specified pages. To do so, enter the desired page numbers.
| Some examples: |
12 |
Print page 12 only |
12-15 |
Print pages 12 to 15 |
12- |
Print page 12 and all of the following pages |
-12 |
Print pages 1 to 12 |
| You can also enter more than one such page number by separating them with commas: |
2-5, 12 |
Print pages 2 to 5 and page 12 |
etc. |
|
▪Copies: Here, you can specify the number of copies of the document to be printed.
▪If you click on the "More options" link at the bottom of the dialog box, you will find additional options for the pages to be printed. For more information, see "More options” below.
Page formatting
Note: Changes to the page formatting only apply to the current worksheet, which is displayed at the bottom center of the dialog box (e.g., "Sheet1" in the above figure).
Use the three top dropdown menus to define common settings for the Page format (Orientation, Page size and Page margins).
▪Page orientation
| Here, you can specify the Orientation of the document on the printed page: Portrait or Landscape. |
▪Paper size
| Here you can specify the paper size for the printed pages. The dropdown list Paper size contains all paper sizes that are supported by the current printer. |
| However, you can also enter custom values manually under Width and Height by clicking on the "Page setup" link. A dialog box will open that corresponds to the command File | Page setup. For more information, see also Setting page format. |
▪Page margins
| You can set the page margins here. You can find further settings by clicking on the "Page setup" link. The program opens a dialog box that corresponds to the command Layout | Page setup. For more information, see also Setting page format. |
Scaling options
Note: Changes to the scaling options only apply to the current worksheet, which is displayed at the bottom center of the dialog box (e.g., "Sheet1" in the above figure).
The bottom dropdown menu offers you various scaling options. These options enable you to scale printouts of the document up or down. By default, No scaling as a fixed scaling factor of 100% is set (which means that the original size is used).
To change the scaling, you will find the following additional options in the dropdown menu:
▪Fit sheet on one page
| Shrink the printout size so that it fits on one page. |
▪Fit all columns on one page
| Shrink the printout to the width of one page. |
▪Fit all rows on one page
| Shrink the printout to the height of one page. |
▪More scaling options
| Select this option in the dropdown menu to open the dialog box "Page setup", where you can make additional settings for scaling. For more information, see Setting page format options. |
More options
Click on the "More options" link at the bottom of the dialog box to open another dialog box with additional printing options:
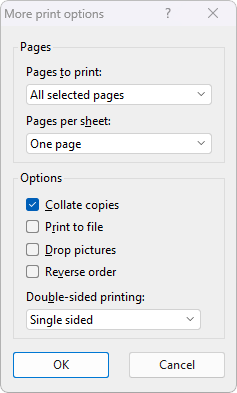 |
▪Pages to print
| Here, you can specify whether all selected pages or only pages with even or odd page numbers should be printed. |
▪Pages per sheet
| PlanMaker usually prints only one page per sheet. However, you can instruct the program to output four pages (scaled down accordingly) per sheet at a time. |
▪Collate copies
| This option specifies whether to sort the print output by page number when printing multiple copies of a document. |
| If you enable this option and print multiple copies of a document with, for example, three pages, the pages will be output in the following order: 1-2-3, 1-2-3, 1-2-3, and so on. |
| If it is not enabled, the order will be: 1-1-1..., 2-2-2..., 3-3-3... |
| Note: Some printers do not support this function. |
▪Print to file
| This option redirects the print output to a file instead of a physical printer. |
▪Drop pictures
| This option skips all pictures and drawings when printing (useful for fast test printouts). |
▪Reverse order
| This option prints the pages from last to first. |
▪Double-sided printing (Windows and Linux only)
| Instead of Single-sided printing only on the front of a page, you can set here for printing to also be performed on the back of a page ("duplex printing"): |
| Double sided, long edge means that you can turn the pages like a book. |
| Double sided, short edge means that you scroll the pages upwards like a clipboard. |
| Note: Your printer must support duplex printing in order to be able to use this feature. |
Page setup
When you click on the "Page Setup" link at the bottom of the dialog box, a dialog box will be opened that corresponds to the command File | Page setup.
Here you will find advanced options for page formatting – in addition to orientation, paper size, and margins, there are also settings for headers and footers or paper trays, for example. For more information, see Setting page format.
Print preview
The print preview on the right side of the dialog box displays a document on the screen exactly as it will look in the printout. You can use it to check whether the data is correctly arranged on the pages and make adjustments before starting to print.
The buttons for the print preview
![]()
These buttons below the print preview are used to scroll between pages. The two outer buttons jump to the first/last page. The two inner buttons scroll to the previous/next page.
The input field in the middle lets you jump to a specific page. Type in the page number here and press the Enter key.
To the right of these buttons, you will see which worksheet (e.g., "Sheet1") you are currently viewing in the print preview. This is useful when navigating between multiple worksheets.
Zoom slider
![]()
You can use the zoom slider in the bottom right corner to change the zoom level of the print preview. To change the zoom level, either drag the slider with your mouse or click on the plus or minus icon.
Tip: Also note the key combination Ctrl+middle mouse wheel for continuous zooming.
Click on the icon ![]() to the left of the slider to display exactly one full page in the print preview.
to the left of the slider to display exactly one full page in the print preview.
Tip: Print comments applied to cells
If the comments applied to table cells via the ribbon command Insert | Comment are to appear in the printout, perform the following two steps before printing:
▪Open the dialog box "Page setup" by choosing the ribbon command File | group Print | Page setup. Switch to the Options tab and enable "Print: Comments" there (see also Setting page format options).
| Note: This option can be set separately for each worksheet. |
▪It is also necessary for you to permanently show the comments inserted in PlanMaker. To do so, use the Comment visibility button on the ribbon tab Review | group Comments. This allows you to permanently show all comments or single comments in your PlanMaker document (see also Using comments).
| Only these displayed comments of a worksheet will be taken into account during PDF export. |