In the master view, the placeholders in the individual slide layouts are usually filled with sample text. This is to illustrate how text in the corresponding placeholder will look later in the slides of your presentation. You can change the character format and paragraph format separately in each placeholder. The same applies to the footer areas, if available. This specified text formatting will then be used on all slides in your presentation that use the corresponding slide layout.
In order to change the text formatting of a placeholder or footer area, you do not have to select the text it contains. Simply click in the placeholder/area so that the blinking text cursor appears in it.
Then use the command groups from the ribbon tab Home | group Character (for font, font size, etc.) or Home | group Paragraph (for indents, tabs, alignment, etc.) to change the format of all text in the area. For more information on these two commands, see Character formatting and Paragraph formatting.
Changing the formatting of bulleted lists in placeholders
Some placeholders contain a bulleted list, as shown in the picture below. Additional formatting options are available here.
The bulleted lists in such placeholders are hierarchical. The list thus consists of different list levels, which can be used to structure the text. Each list level can have a different character formatting and indentation, so that the individual levels are more distinct:
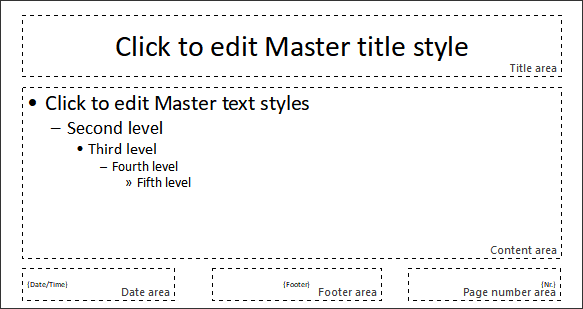
In the center: a placeholder with a hierarchical bulleted list
If you enter text for a list entry in the normal slide view and increase or decrease the level of the entry, the font size and the bullet size change according to the format that you set here in the master view. You can even set the bullet type and its color for each list level to your liking.
To change the formatting of this bulleted list, first switch to the master view with the ribbon command View | group Master | Slide master and click in the desired placeholder. You can now change the formatting of each list layer as follows:
▪Change character formatting: To change the character formatting of a list level, click anywhere within the text for that level. Then switch to the ribbon tab Home | group Character and change the formatting as desired.
| Alternatively: Right-click to open the context menu and select the entry Character. |
| For more information on this dialog box, see Character formatting. |
▪Change paragraph formatting: The different list levels are indented differently. You can change these indents with paragraph formatting. To do so, click again with the mouse button in the respective list level, then switch to the ribbon tab Home | group Paragraph and make the desired changes. You can change all other paragraph properties in addition to the indents, of course.
| Alternatively: Right-click to open the context menu and select the entry Paragraph. |
| For more information on this dialog box, see Paragraph formatting. |
▪Change bullets: You can also change the bullets displayed in the list. Right-click in the desired list level, select the entry Bullets and numberings from the context menu to open the dialog box and make the desired changes.
| Alternatively: On the ribbon tab Home | group Paragraph | Bullets |
Note: By default, the color and size of the bullets are set to Auto in the dialog box. This means that they automatically adjust to the color and size of the text to the right. However, you can choose a different color or size at any time, which then cancels this automatic link.
| For more information on formatting bullets and numbering, see Bulleted and numbered lists. |