Footers are placed in the lower part of a slide and are divided into three footer areas: on the left, a date area, in the center, a title area (or any other information), and on the right, a page number area.
To insert and fill these footer areas with content, choose the ribbon command Insert | group Text | Header / footer, which is available in both the master view and the normal slide view.
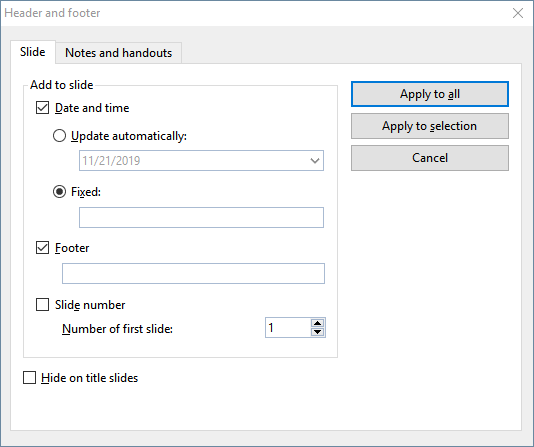
The following dialog box is displayed:
In front of each area, you will see a checkbox. Enable it for all areas that should appear on the slide. Then change the contents of the individual areas as required.
The dialog box provides the following options:
▪At the top of the dialog box, you can specify whether the Date and time should appear on the slide. This will then be displayed in the lower left corner of the slide.
| The option Update automatically uses the system date and time and updates them on an ongoing basis. In the dropdown list below, you can specify the format of the date and time. |
| The option Fixed lets you manually enter any date, such as the creation date of the presentation. |
▪In the Footer area, you can enter any text, such as the title or author of the presentation. This area is centered at the bottom of the slide.
▪The last part of the footer is for displaying the Slide number, which appears in the lower right corner of the slide. The slides are automatically numbered for this purpose. If desired, you can also specify here the number which should be assigned to the first slide of the presentation.
▪Title slides in a presentation generally do not have footers. You can achieve this by enabling the option Hide on title slides.
The buttons on the right side of the dialog box give you the option of either applying the settings you made to all slides in your presentation (Apply to all button) or applying them only to the previously selected slides (Apply to selection button).
Note: The Apply to selection button is not available in the master view, but only in the normal slide view. Changes you make in the master view in the above dialog box always affect all slides.
You can then select the inserted areas on the slide and adjust them further if necessary. However, these changes will only affect the current slide.
The following operations are possible:
▪To change the formatting of the content, use the usual commands of the command groups Character and Paragraph on the ribbon tab Home.
▪To move an area, use your mouse to drag it to the desired position.
▪To change its size, drag one of the handles surrounding its borders.
▪You can edit the contents of the areas in each slide individually by clicking in a created area on the slide and typing your changes directly.
▪In the command group Objects on the ribbon tab Home, you can edit the object properties (fill color, line color, etc.) of an area.
▪On the contextual ribbon tab Object (which appears as soon as you select a header or footer), you will find additional options for the general object properties that correspond to those of text frames. For more information, see Changing text frame properties via the ribbon tab.
Note: For information on changing footers for all slides or only for specific slide layouts using the master view, see Changing headers/footers in master view.