To reformat a single column passage of text to a three-column passage for example, you only have to select the text and change the number of columns via the ribbon command Columns.
Via the "Columns" icon
For up to three columns, you can easily use the predefined entries of the Columns icon  on the ribbon tab Layout | group Section.
To do so, proceed as follows:
| 1. | Select the text area whose number of columns you want to change. |
| 2. | Click on the small arrow of the Columns icon and select a predefined column layout from the menu that appears: up to three columns (of the same size); a two-column layout with a narrower column on the left or a two-column layout with a narrower column on the right. |
The selected column layout will now be applied to the selected text. To do so, TextMaker automatically sets up a separate section in the document with the required section breaks. (For more information, see also What are sections?)
If, on the other hand, you want to apply a specific column layout to the entire document, simply place the cursor in the text (do not select anything). Then select the desired number of columns as described above. Note: This only works if your document is not divided into sections.
In the dialog box below, the option Apply to also provides even more differentiated methods of specifying which part of the document should be divided into columns. The dialog box also provides numerous other options, such as a larger number of columns.
Tip: If you want to use different numbers of columns on the same page, you must define sections and proceed as follows: In the dialog box shown below, disable Page break and set the Height to Auto.
Other options: Via the dialog box "Section"
Additional options for setting up multi-column text can be found in the dialog box "Section".
To do so, proceed as follows:
| 1. | Select the text whose columns you want to adjust. |
| 2. | Click directly on the Columns icon to open the dialog box. |
| Alternatively: Click on the small arrow of the icon and select More in the dropdown menu. |
The system displays the following dialog box:
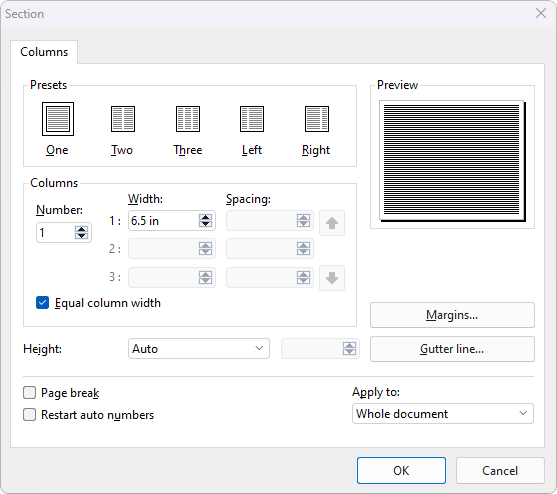
Specify the number of columns and their format in this dialog box:
▪Presets section
| Here, you can select one of several predefined column layouts by clicking on it. |
▪Columns section
| This option lets you specify the number, width and spacing of columns. |
| Enter the desired number of columns for Number. |
| Specify the width and spacing of the columns in Width and Spacing respectively. If Equal column width is enabled, all columns will have the same width and spacing. If this option is disabled, you can specify a different width and spacing for each column. |
▪Height section
| This option lets you specify the height of the columns: |
| Auto: If you select this setting, TextMaker automatically adjusts the column height to fit the text length so that all columns are of equal height. |
| Page height: With this setting, the column height is set equal to the page height, regardless of the text length. |
| Fixed height: If you select this setting, you can set a fixed column height. |
▪Page break
| If this option is enabled, TextMaker inserts a page break before the multi-column section. |
▪Restart auto numbers
| This option is not relevant for multi-column layout. If it is enabled, it resets the "Auto number" field in the relevant section to one. For information on using this field, see Numbering with auto numbers. |
▪Text direction
| You can use this option to change the text direction of a multi-column section of text in Arabic. If you set the direction to right-to-left, the column on the far right becomes the first column (instead of the column on the far left). For more information, see also Working with Arabic text. |
▪Margins button
| Here, you can specify the margins of the section, including the amount of blank space TextMaker should insert above and below the section. |
▪Gutter line button
| Click on this button if you want a vertical line to be displayed between the columns of multi-column text. |
| When you click it, the program displays a dialog box in which you can select the desired line style, thickness, etc. |
| If you want to remove the line, simply select No line as the Line style. |
▪Apply to:
| In the dropdown list, specify which parts of the document are to be affected by the settings made in this dialog box: |
| Whole document: the entire document. |
Note: The following options in the list refer to defined sections. A section is a passage of text with the same number of columns. For more information, see What are sections? Furthermore, the available options will vary depending on what you have selected in the text.
| This point forward: the passage of text from the current position of the text cursor to the end of the document. In this case, a new section is automatically defined after the cursor. |
| Selected text: the section of text currently selected in the document. In this case, a new section is automatically defined for the selected passage of text. |
| Current section: the current section of text. |
| Selected sections: all sections included in the current selection. |
| To end of section: the text from the text cursor to the end of the current section. |