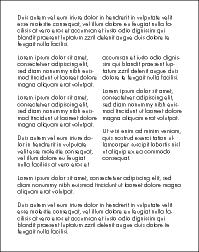
The term "section" was mentioned several times in this chapter. What are sections? A section is a passage of text in which you can, for example, format the number of columns uniformly, separately from the rest of the text.
Note: Defining sections is primarily performed for multi-column text, but it is also relevant for restarting Auto numbers or displaying Line numbers.
Example: In the middle of an otherwise single-column document, a section of text is formatted in two columns. The prerequisite for such a presentation of your text is that the text is divided into several sections. You can do so manually using the Insert section break feature (see below). You can then format a separate number of columns for each section.

By doing this, you have created three sections: a single-column section at the beginning of the document, a two-column section in the middle and another single-column section at the end.
If you would rather format the two-column section in the middle as three columns, simply place the text cursor anywhere within this section, and choose the command Columns on the ribbon tab Layout | group Section. Then change the number of columns to 3. The two-column section will then become a three-column section.
Inserting section break manually
Choose the ribbon command Layout | group Page setup | Insert break (click on the icon’s arrow and select the entry Section break) to specify the beginning of a new section. Before choosing the command, place the cursor in the text where you want the new section to begin. The section will be valid from this point until the next section break (if one is inserted), otherwise until the end of the document.
In this way, documents can be divided into several sections. Each section can be formatted with a different number of columns.
Tip 1: If you enable the icon ![]() for displaying the formatting marks on the ribbon tab Home | group Paragraph, you can see the breaks for better orientation in the document.
for displaying the formatting marks on the ribbon tab Home | group Paragraph, you can see the breaks for better orientation in the document.
Tip 2: The number of the current section (Section1, Section2, etc.) is displayed in the status bar.
Section breaks are inserted automatically when columns are defined
If you format a text segment with multiple columns using the command Columns (see previous section), a separate section with the required section breaks is automatically created by TextMaker. To do so, proceed as follows:
| 1. | Select the passage of text that is to have a different number of columns than the rest of the document. |
| 2. | Click on the arrow of the Columns icon |
| 3. | Select the desired number of columns. |
| Tip: Clicking directly on the Columns icon will open a dialog box in which you can make further settings (see previous section). |
A separate section with the selected number of columns is now defined for the selected passage of text, and the document is divided into several sections by the automatically inserted section breaks.
It is thus unnecessary to insert section breaks manually.
Page break before sections
By default, TextMaker does not insert a page break between two sections, but simply lets the text continue from one section to the next. If, on the other hand, you want to always have a page break before a specific section, move the text cursor to this section. Open the dialog box "Section" by clicking directly on the Columns icon on the ribbon tab Layout | group Section, and enable the option Page break in this dialog box.