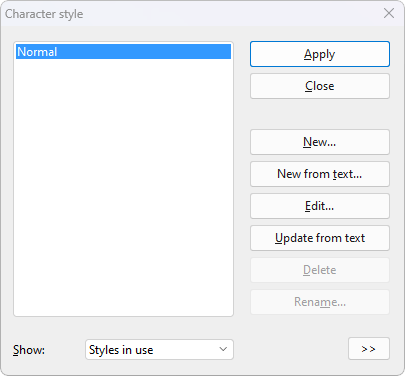
To create a character style, proceed as follows:
| 1. | Right-click in the text to open the context menu and select the entry Character style. |
| The following dialog box opens: |
| 2. | In the list on the left side of the dialog box, select the style on which you want your new character style to be based. In the event of doubt, use the "Normal" style. |
| Note: The style of the section of text in which the text cursor was located before choosing the command Character style is always preselected here in the dialog box. For information on changing the style basis – even afterwards – see "Based on" character styles. |
| 3. | Then click on the New button. |
| 4. | Give the character style any name you like. |
| 5. | The program will display a dialog box, which is very similar to the dialog box for the command group Home | Character. Here, you can specify the desired character formatting (see Character formatting). |
| 6. | If you will need this style frequently, you can assign a shortcut key to it (see below). |
| 7. | When all the desired settings have been made, click on OK in the dialog box Character to create the style. |
| 8. | Exit the Character style dialog box with Close. |
The style is now created and ready for use. You will learn how to use it shortly (in Applying character styles).
Creating character styles from existing text
Alternatively, you can first format some text as desired and then create a new style that assumes this exact formatting. For this purpose, use the New from text button instead of the New button.
This procedure is useful if you have previously formatted text manually and want to have a character style that has exactly the same character formatting.
To do so, proceed according to the following detailed steps:
| 1. | Apply the desired character formatting (font, font size, etc.) to a section of text. |
| 2. | Place the text cursor in this section of text or select it as both options work equally well. |
| 3. | Create a new character style via the command Character style as described above. Important: Use the New from text button in the dialog box now instead of the New button. |
A style created in this way will behave exactly like any other style. The only difference is that it assumes the formatting of existing text when it is created. (Of course, you can still change the formatting of the style at any time, regardless of this text.)
Using shortcut keys
If you need a style frequently, you can assign it a shortcut key at any time. The advantage of this is that you can then enable the style very swiftly with one press of a key.
To assign a shortcut key to a style, click on the Edit button to open the dialog box and switch to the Style tab. There, position the text cursor in the Shortcut key input field and press the desired key combination (starting with Ctrl or Alt).
Note: If you press a key combination that is already assigned, the current assignment is displayed below the input field Shortcut key. You should then press the Backspace keyÕ to delete your shortcut key and use a different key combination. Otherwise, you will overwrite the key combination for another style or even for one of TextMaker's commands.
We recommend that you always use key combinations that include the keys Ctrl and Shift since they are not usually assigned.
