The contextual ribbon tab Table contains several commands (or a dialog box) with which the appearance of the current table cell can be changed. Of course, you can select several cells (or complete rows and columns) before choosing the commands described below to change their properties together.
Common options: Via the icons of the ribbon tab "Table"
For the quick application of selected cell properties, you can use the following icons of the ribbon tab Table directly:
▪Cell width ![]() (in the group Cell size): Here, you can specify the exact width. Enter the desired value or use the small arrow buttons to increase/decrease the value.
(in the group Cell size): Here, you can specify the exact width. Enter the desired value or use the small arrow buttons to increase/decrease the value.
▪Text alignment ![]() (in the group Format): Here, you can specify how the cell content is to be aligned within the cell. Different combinations of left, right, top, bottom, centered are possible.
(in the group Format): Here, you can specify how the cell content is to be aligned within the cell. Different combinations of left, right, top, bottom, centered are possible.
▪Shading ![]() (in the group Format): Here, you can apply shading to the selected cells. To do so, select the desired cells and then click on the icon's arrow instead of the icon itself. The program opens a dropdown menu in which you can click to select the desired type of shading.
(in the group Format): Here, you can apply shading to the selected cells. To do so, select the desired cells and then click on the icon's arrow instead of the icon itself. The program opens a dropdown menu in which you can click to select the desired type of shading.
| If you then want to apply the exact same type of shading to other cells, simply select them and click on the icon itself (not the arrow). TextMaker will then reapply the last selected type of shading. |
| For individual adjustments, select the entry More via the icon's arrow. The program opens a dialog box that corresponds to the dialog box of the command Home | group Paragraph | Paragraph shading. For more information, see Shading. |
▪Borders ![]() (in the group Format): This option provides the same functionality as above for shading.
(in the group Format): This option provides the same functionality as above for shading.
| For individual adjustments, select Borders in the dropdown menu. The program opens a dialog box that corresponds to the dialog box of the command Home | group Paragraph | Borders. For more information, see Borders and lines. |
Advanced options can be found via the dialog box below.
Additional options: Via the dialog box
You open the dialog box with the ribbon command Table | Properties ![]() | Cell properties.
| Cell properties.
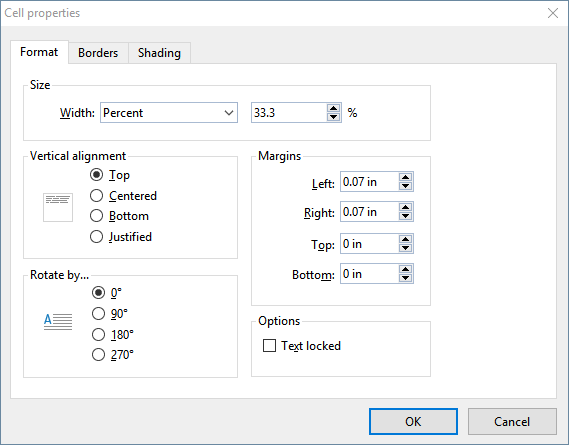
In the dialog box, the Format tab offers the following options:
Size
Here, you can change the Width of the selected cells by choosing from among the following options:
▪Fixed
| If you select this option, you can specify the width exactly. Enter the desired value to the right of it. |
▪Percent
| If you select this option, you can enter the desired width as a percentage of the overall table width. |
| For example, each cell in a table of three columns has a default width of 33.3%. If, for example, you want the first column to be twice as wide as the other two columns, enter "50" for all cells in the first column and "25" for the cells in the second and third columns. |
▪Auto
| If you select this option, TextMaker automatically determines an appropriate width. In this case, the cell widths will be evenly divided into the available space. |
Any of these three options can be applied in any combination within the same table. For example, you can create a table where the cells in the first column have a fixed width, but the other columns are set to "Auto". If you then increase the width of the first column, the other columns will automatically become narrower accordingly.
Tip: Cell widths can also be changed with the mouse. To do so, drag the right border of a cell left or right with your mouse. If you have not selected anything, the width of the entire column changes. If you have selected specific cells, however, only their width changes.
Vertical alignment
This setting determines how the cell contents should be aligned within the cell:
Option |
Explanation |
Top |
The cell content will be aligned to the top edge of the cell. (This is the default setting.) |
Centered |
The cell content will be centered between the top and bottom edges of the cell. |
Bottom |
The cell content will be aligned to the bottom edge of the cell. |
Justified |
The lines of text within the cell will be equally spaced in such a way that the top line will be flush against the top edge of the cell and the bottom line flush against the bottom edge. |
Rotate by...
Here, you can specify the angle of rotation for the cell content.
Margins
Here, you can change the inner margins of the selected cells.
Options
If you enable the option Text locked, you will not be able to change the contents of the selected table cells when the document is edited in form mode.
However, this option is disabled by default; thus the cells can also be edited in form mode.
For more information, see Protecting contents of form objects.
Borders tab
On this tab, you can apply border lines and gridlines to the selected cells (or change the existing lines).
The options on this tab correspond to those in the dialog box of the command Home | Borders. For more information, see Borders and lines.
Note: If you have selected several cells, you can change the gridlines between the cells in addition to the outer borders.
Shading tab
Here, you can specify a shading for the selected cells.
The options on this tab correspond to those in the dialog box of the command Home | Paragraph shading. For more information, see Shading.