Like all types of frames, the header and footer frames (where the headers and footers are located) also have certain properties that can be changed on the contextual ribbon tab Header and footer. For example, you can adjust the height, change the distance to the text and to the edge of the page or add shading and borders to the frame.
Common options: Via the icons of the ribbon tab "Header and footer"
Use the buttons of the command groups Size and position and Format to apply common options directly.
First, click with the mouse in the header or footer frame – depending on whether you want to edit the headers or footers – and customize the following properties according to your needs:
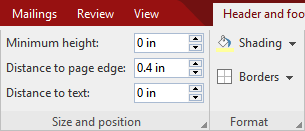
▪Command group Size and position
| You can enter the desired values in the respective input fields or increase/decrease the values with the small arrow buttons. The following settings are possible: |
| Minimum height: Here, you can set the minimum height of the header or footer frame. The other option Fixed values can be found in the dialog box, see below. |
| Distance to page edge: Distance between the frame and the edge of the page. |
| Distance to text: Distance between the frame and the body text. |
▪Command group Format: Shading ![]()
| If you click on the small arrow on the Shading icon, you will see a dropdown menu with standard colors and color variations that you can apply. |
| The last selected color is displayed as a horizontal bar in the icon. This "memory function" also applies to other shading settings, such as patterns or shades (which can only be found in the dialog box). You open the dialog box by clicking on the icon's black arrow and selecting More in the dropdown menu. For more information, see below. |
| Removing shading: Click on Transparent in the dropdown menu to remove existing shading. |
▪Command group Format: Borders ![]()
| If you click on the small arrow of the Borders icon, you will get a dropdown menu with common borders and lines. |
| Tip: You can also combine individual lines to your liking by reopening the dropdown menu of the Borders icon and adding another attribute, for example, first positioning a line at the top and then an additional line at the bottom. |
| Removing borders/lines: Click on None in the dropdown menu. All borders/lines will then be completely removed. |
| If you want to edit/remove individual border lines or define additional properties for borders and lines, click on Borders in the dropdown menu. A dialog box opens with other options (see below). |
Other options: Via the dialog box of the ribbon tab "Header and footer"
The dialog box of the contextual ribbon tab Header and footer provides additional options for customizing shading, borders/lines and the height of headers and footers.
To do so, proceed as follows:
| 1. | Click with the mouse in the header or footer frame – depending on whether you want to edit the header or the footer. |
| 2. | Open the dialog box via the arrow |
The following settings can be made in this dialog box:
Properties tab
▪Height
| Here, you can change the height of the header or footer frame: |
| At least: This is the default setting. The height of the frame is adjusted automatically. The more text you enter, the larger the frame becomes. In the input field to the right of it, you can enter the desired minimum height if required. |
| Fixed: If you select this option, however, you can specify the exact height of the frame yourself. Note: If this option is selected, TextMaker will display a red bar at the bottom edge of the frame whenever the header or footer text does not fit completely within the frame. In this case, set the height to a larger value, select the option At least or reduce the amount of text in the frame. |
Note: TextMaker automatically adjusts the width of header and footer frames to the page margins. However, you can always use paragraph indents in your headers and footers if you want them to be wider or narrower.
▪Distance to page edge
| Here, you can specify the amount of space TextMaker should leave between the frame and the (top or bottom) edge of the page. |
▪Distance to text
| Here, you can specify the amount of space TextMaker should leave between the frame and the body text. |
Borders tab
Here, you can add individually designed border lines to the frame.
The controls on this tab correspond to those of the ribbon tab Home | Borders. For more information, see Borders and lines.
Shading tab
Here, you can add customized shading to the frame.
The controls on this tab correspond to those of the ribbon tab Home | Paragraph shading (see Shading).