You can change the size and margins of objects via the following methods:
Dragging the handles on the selection frame
▪Click on the object to select it. The object will then be surrounded by a blue selection frame which also contains some round "handles". When you drag one of these handles with the mouse, the size of the object is changed accordingly.
▪In the case of frames and drawings, you can also change the wrap margins:
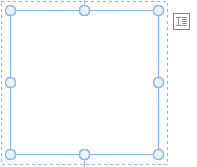 |
| The inside (solid) lines of the selection frame represent the object's size. |
| The outside (dashed) lines represent the object's wrap margins. If you drag one of these lines, the corresponding wrap margin will be enlarged or reduced. |
Via the dialog box
You can also resize objects via the dialog box. To do so, right-click on the object to open the context menu and select the last entry Properties. On the Format tab, these settings can be specified exactly in numeric values. For more information on this dialog box, see Object properties, Format tab.
Via the ribbon tab
If you have selected an object, you will also find input fields for the Width and Height in the group Resize on the far right of the object-specific ribbon tab. Type the desired values here or increase/reduce the values with the small arrow keys next to the input field.
If the option Keep aspect ratio is enabled, changes in height automatically have a proportional effect on width (and vice versa).
For OLE objects, an additional option named Keep scaling is available. If it is enabled, any changes made to the object's size within its source application will automatically affect the object in TextMaker. If it is disabled, the object will always remain the same size in TextMaker. (Note: Not all OLE source applications support this feature.)