FreeOffice: This function is not included in SoftMaker FreeOffice.
If you want to send a letter, you can either create an address label for it (as described in the last section) or simply have TextMaker print the address directly on an envelope.
To do so, proceed as follows:
| 1. | Choose the ribbon command Mailings | group Create | Envelope |
| 2. | Click on the Paper settings button, set the paper format of the envelope to be printed and click on OK. |
| 3. | In the Sender field, enter your own address. |
| 4. | In the Recipient field, enter the recipient's address. |
| You can type the address in manually or use database fields from your address database. To do so, click on the Database field button and then select the field to insert. |
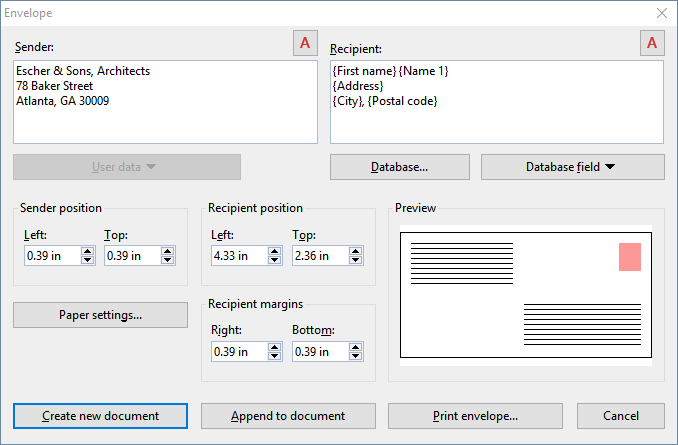 |
| 5. | When everything is entered, click on one of the following buttons: |
| Create new document: This option creates the envelope as a new document. |
| Append to document: This option appends the envelope to the end of the current document. |
| Print envelope: This option prints the envelope once and then discards it. |
| 6. | If you have inserted database fields, TextMaker now displays the address database. Browse to the record with the desired recipient and click on the Insert button. |
The envelope will now be created and filled in.
Note that the above settings only have to be made once. TextMaker will remember the paper format you use for envelopes and how you want to place the database fields. Of course, you can change the settings in this dialog box whenever you like.
The following settings can be made in the above dialog box:
Sender
Use this field to enter the sender's address.
If necessary, you can use the button ![]() above the field to change the font in which the address is to appear on the envelope.
above the field to change the font in which the address is to appear on the envelope.
Recipient
Use this field to enter the recipient's address.
Tip: It is recommended that you use the database fields of your address database rather then type the address manually. To insert a database field, click on the Database field button.
If you have not yet selected a database, you must first click on the Database button and select the desired database.
If necessary, you can use the button ![]() above the field to change the font in which the address is to appear on the envelope.
above the field to change the font in which the address is to appear on the envelope.
Sender position
Here, you can change the position of the sender's address on the envelope (relative to the top left corner).
Recipient position
Here, you can change the position of the recipient's address.
Recipient margins
Here, you can change the right and the bottom margin of the recipient's address.
Paper settings button
This button opens an additional dialog box in which you can specify the exact paper format of the envelope.
The following options are available:
▪The Envelope type list offers all paper formats supported by the current printer. Here, select the format of the envelope type used. Alternatively, you can also manually specify your own values under Width and Height.
▪If your printer has multiple paper trays, you can use the option Paper tray to set the tray which the printer should use. (This option is only available on Windows.)
▪Under Envelope orientation, you set how envelopes have to be inserted in your printer's tray (left-aligned, centered or right-aligned; rotated or not rotated).
▪If required, you can also set an Additional offset if the printer prints the envelope slightly offset.
Tip: If you have created an envelope with this command and then saved it as a document, you can edit the above settings in it at any time. To do so, click on the group arrow![]() in the bottom right corner on the ribbon tab Layout | group Page setup in the document to open the dialog box. Switch to the Page format tab and click on the Envelope settings button at the bottom.
in the bottom right corner on the ribbon tab Layout | group Page setup in the document to open the dialog box. Switch to the Page format tab and click on the Envelope settings button at the bottom.