FreeOffice: This function is not included in SoftMaker FreeOffice.
You can use the ribbon command Mailings | group Create | List/Label  to create lists and labels of all kinds with minimal effort. This command is primarily intended for creating address labels. The corresponding addresses should be available in the form of a database. (For basic information on working with databases, see the first sections of Database.)
In addition to labels, you can also use this command to create lists and tables with the data of a database. The differences are as follows:
▪Labels: This option is used for producing labels, for example, address labels containing one address (from a database) per label.
▪Lists: This option is used for producing lists, for example, address lists containing one address per line – for example, Thomas Jones, 42 Main Street, Tucson, etc.
▪Tables: This option is similar to lists but with the data distributed over the cells of a table (one address per cell).
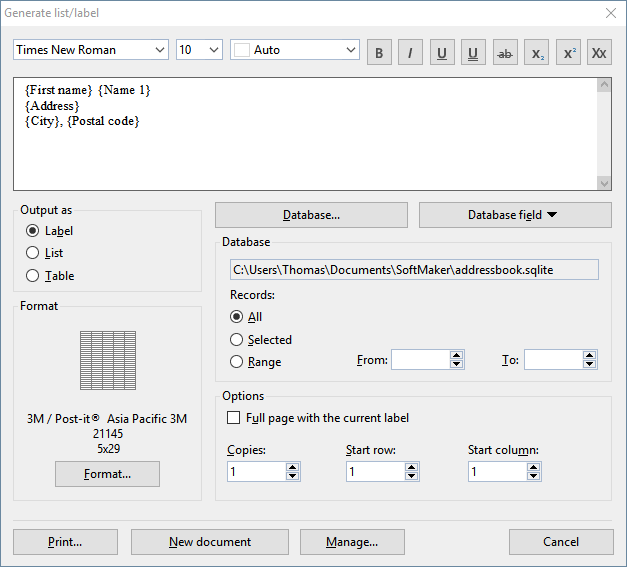
Working with lists and labels is easy: If you want to create, for example, address labels, choose the aforementioned command. In the dialog box that appears, first specify the database to use (i.e., the database containing the addresses). Then insert the desired database fields into the large input field – just as they should appear later on the label (see screenshot above). Finally, select the label format from a predefined list of labels of many manufacturers. Done! Printing can begin.
Tip: The Manage button in the dialog box allows you to save label definitions (that is, all settings made in the dialog box) and retrieve them later at any time. This also works with lists and tables.
Creating lists/labels
To create labels, for example, proceed as follows:
| 1. | Choose the ribbon command Mailings | group Create | List/Label . |
| 2. | Under Output as, select what you want to create: Label, List or Table. In our example, you would select Label. |
| 3. | If you want to display the contents of a database in the label: Click on the Database button and select the desired database – for example, the supplied address database addressbook.sqlite. |
| 4. | The large input field in the upper part serves as a "mask" for the content of the label. Enter the desired content there – just as you want it to appear on the label later. You can insert database fields as well as ordinary text and combine them to your liking. |
| To insert database fields, it is best to use the Database fieldbutton. A list of all fields in the database will be displayed. If you click on one of the fields, it will be inserted at the current position of the text cursor. |
| The miniature formatting toolbar above the input field allows you to change the format (font, font size, etc.) of the text in the input field if necessary. Select the text you want to change beforehand. |
| When you have finished filling in the input field, proceed as follows: |
| 5. | For labels, you now need to click on the Format button and set the format of the labels that you want to print. The button opens another dialog box where you can select the manufacturer and product number of the label from predefined lists. |
| If you are using a label that is not included in the lists, you can specify a new label format by clicking on the New button and entering the measurements of the label. (See an explanation of the options in the dialog box below.) |
| 6. | Set up the other options in the dialog box to your liking (see below). |
| 7. | When everything is done, press one of the following buttons: |
| Print: This option prints the labels. The usual "Print" dialog box appears for this purpose. |
| New document: This option creates a new document with the (completed) labels instead of printing them. |
| Manage: This button allows you to save label definitions (i.e., all settings made in this dialog box) and retrieve them later at any time. This works with labels as well as with lists and tables. For more information, see the end of this section. |
The creation of lists and tables works accordingly. There are only fewer options available in comparison to labels. In addition, the Print button is replaced by an Insert button here. This inserts the list/table into the document at the current position of the text cursor.
Options of the dialog box
The options in the dialog box of the above command have the following functions:
▪Large input field
| In the large input field at the top of the dialog box, enter the desired content for the label (or list/table) – just as you want it to appear later on the label. The screenshot at the beginning of this section shows an example. |
| You can add text by simply typing it in. |
| You can also insert database fields (if you selected a database using the Database button). To insert a field, click on the Database field button and then select the desired field. Alternatively, simply type the field's name enclosed within curly braces (for example, {City}). |
| The miniature formatting toolbar above the input field can be used to change the text formatting. To do so, proceed as in a normal document: First, select the text and then apply the desired formatting. |
▪Output as
| Here, you can specify if the command should create labels, a list or a table. |
▪Format
| Only for labels: Here, you can see which label format is currently selected (manufacturer, product name, number of rows/columns). |
Note: The format must be large enough to fully accommodate the content of the label. Otherwise, the content will not appear completely in the subsequent printout.
| To select a different format, click on the Format button and select the label's manufacturer and product name from the lists. If required, you can also set the margins to be left blank on each (individual) label. |
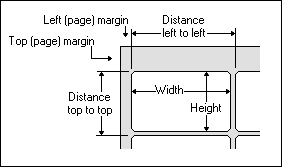
| If you are using labels that are not included in the lists, click on the New button to create a new user-defined label format. If known, specify the manufacturer name and product name/number. Then, use a ruler to measure the labels and enter the resulting values into the dialog box. |
| The following figure shows how some of the values are related: |
| The Edit button allows you to edit existing user-defined label formats again. The default formats cannot be changed – but you can always create a user-defined format based on a predefined format by selecting it in the list and then clicking on the New button. |
| The Delete button deletes the selected user-defined format. |
▪"Database" button
| Lists and labels are often used to output the contents of a database. If you click on the Database button, you can specify which database this should be – for example, the supplied address database addressbook.sqlite. |
▪"Database field" button
| This option is used to insert database fields. Clicking this button opens a list of all database fields available in the selected database. If you click on one of these fields, it will be inserted into the large input field in the dialog box. |
▪"Database" section
| The "Database" section displays the path and name of the currently selected database (see the Database button above). |
| Here, you can also specify which database records are to be used: All, only Selected (see Selecting records for a mail merge) or a Range of records that you can specify by entering the first and last record numbers. |
▪"Options" section
| This section changes depending on what you selected for the option Output as: |
| You can make the following settings for the output of labels: |
| Full page with the current label: If you enable this option, a whole sheet of labels, containing identical copies of the label, will be output for each individual label. This is useful for simple labels with fixed text (without using a database) if you want to print whole sheets of one label at once. |
| Copies: Here, you can set how many copies of each label should be output. |
| Start row and Start column: Here, you can specify in which row and column of the first label sheet the output should start. This is useful when reusing label sheets where some of the labels have already been printed. |
| There are no options for lists. |
| For tables, you can make the following settings: |
| Row height: Here, you can set the height of the table rows: Auto (determine optimum height automatically), Exact (specify the exact height) or At least (specify the minimum height, but allow each row to increase automatically if more space is needed). |
| Columns: Here, you can specify the number of columns the table should contain. |
▪"Print" or "Insert" button
| For labels, the dialog box includes a Print button, among other things. This will take you to the "Print" dialog box, where you can start printing the labels. |
| For lists or tables, the Insert button appears instead. By clicking on it, you insert the list/table into the current document. |
▪"New document" button
| By clicking on this button, you create a new document containing the completed labels (or list/table) – just as they would appear in the printout. |
▪"Manage" button
| This button allows you to save label definitions (i.e. all settings made in this dialog box) and retrieve them later at any time. It will open a dialog box with the following buttons: |
| Save: This option saves the label definition (i.e. all settings made in this dialog) under any name. |
| Load: This option restores a label definition. First, select the desired entry in the list. |
| Delete: This option deletes the selected label definition. |
| Rename: This option allows you to enter a new name for the selected label definition. |
| This not only works with labels but also with lists and tables. |