Apart from the fact that the page formatting can be set differently in each chapter, there is also the chapter formatting.
You can change the page formatting of a chapter via the familiar commands. For more information, see Page formatting.
To change the chapter formatting, proceed as follows:
| 1. | Position the text cursor anywhere within the desired chapter – or select multiple chapters to change all their formatting simultaneously. The selection can start in any paragraph of the first chapter and end in any paragraph of the last chapter. |
| 2. | Choose the ribbon command Layout | Chapter  . . |
| 3. | Make the desired changes (see below) and confirm with OK. |
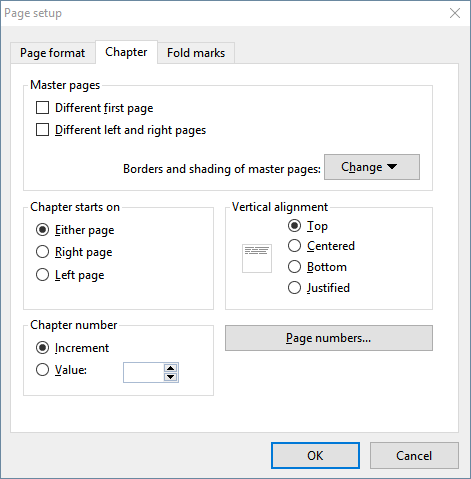
In the dialog box of this command, you can make the following settings:
▪Master pages
| Changing the settings for the chapter's master page(s) (see also Master pages): |
| Different first page: If you enable this option, the first page of the chapter uses a master page that is different from the other pages. This is useful if, for example, you want the first page of your document (or chapter) to have a different header from those on the remaining pages. |
| Different left and right pages: You need this option if you want your document to be printed on both sides, as is the case with a book, for example. If this option is enabled, TextMaker creates one master page for all left-hand pages of the document – and another for all right-hand pages. This makes it possible, for example, to place the page number on the left in the footer of left-hand pages and on the right in the footer of right-hand pages. |
Tip: In the Master pages view, the type of master page is displayed on the top of each master page. If, for example, TextMaker displays "Chapter 7, right master page" there, the page itself is the master page for all right-hand pages in chapter 7.
| Borders and shading of master pages: Here, you can add borders or shading to master pages – and thus to all corresponding document pages of the chapter. To do so, click on the Change button and then select the master page for which you want to change these settings. The usual dialog box for applying border lines or shading will then appear. For more information, see also Changing the page background. |
▪Chapter starts on
| Whenever you insert a chapter break, TextMaker always makes a page break. Thus, new chapters always start on a new page. |
| If you now change the option Chapter starts on from the default setting Either page to Right page, for example, TextMaker will ensure that a chapter always starts on a right-hand page. If the beginning of the chapter then ends up being on a left-hand page, TextMaker will automatically insert a blank page so that the chapter starts again on the next right-hand page. |
| For example, it is customary for every chapter in a printed book to start on a right-hand page. This makes it easier for the reader to find the beginning of new chapters when quickly flicking through a book. |
▪Vertical alignment
| Here, you can change the vertical alignment of the body text on the page. |
| If, for example, you select Centered, the text is vertically centered on the page. If you select the option Justified, the paragraphs are spaced evenly in such a manner that the body text starts right below the top page margin and ends right above the bottom page margin. |
▪Chapter number
| TextMaker automatically numbers chapters incrementally. You can always see the number of the current chapter in the status bar. |
| If you change the option Chapter number from Increment (the default setting) to Value, you can specify your own value for the chapter number. If, for example, you enter "5" as the number for the third chapter, the document's chapters will have the numerical sequence 1, 2, 5, 6, 7, etc. |
| Tip: The chapter number can be inserted into the text (for example, in a header or footer) at any time via the ribbon command Insert | Field  . . |
▪Page numbers button
| You can insert a field Page number into your document at any time in order to display the current page number (for example, in the header or footer). This button opens a dialog box in which you can change the format of the page numbers. You can also manually set the initial value for page numbering to a fixed value. |
▪Page format tab
| The Page format tab in this dialog box can be used to set the page format (paper size, orientation, margins, etc.). For more information on each option, see Page setup. |
| Don't forget that you can specify a different page format for each chapter. Thus, if you have divided a document into several chapters and you want to change the page formatting for the whole document, you must first select the whole document. |