Using a document template with an assigned database is easy:
Start a new document with the command File | New ![]() . In the dialog box of the command, you can specify on which template this document should be based.
. In the dialog box of the command, you can specify on which template this document should be based.
If you select a template that has a database assigned to it, TextMaker displays this database and lets you choose the record to be inserted into your text. Scroll to the desired record, and then click on the Insert button.
The procedure is as follows:
| 1. | Choose the command File | Open |
| 2. | In the dialog box, choose a document template that you have created with a database connection or one of the included templates, and confirm with OK. |
| 3. | The program will now open a dialog box in which the corresponding database will be displayed. |
| Tip: The two options in the bottom right of the dialog box allow you to switch between List and Form view. |
 |
| 4. | Use the buttons |
| You can also enter a new address after you create a new record via the Append button. |
| (For more information on using on this dialog box, see below.) |
| 5. | Click on the Insert button. |
| Note: The database fields in this document will then be physically replaced by the content of this single inserted record. The database fields themselves will be removed from the document and will thus be no longer editable. For more information, see also the "Notes" in Importing individual addresses. |
As a result, TextMaker will now replace each database field in the template with the content of the corresponding field from this record.
This results, for example, in a fully completed letterhead including the address of the letter recipient. All you have to do now is write the letter and then print the document. To do so, choose the ribbon command File | Print – and not File | Print merge.
Tip: In the dialog box of the command File | New, you can also see some folders. They contain prepared document templates for writing letters. Most of these templates have been assigned to the supplied example database addressbook.sqlite.
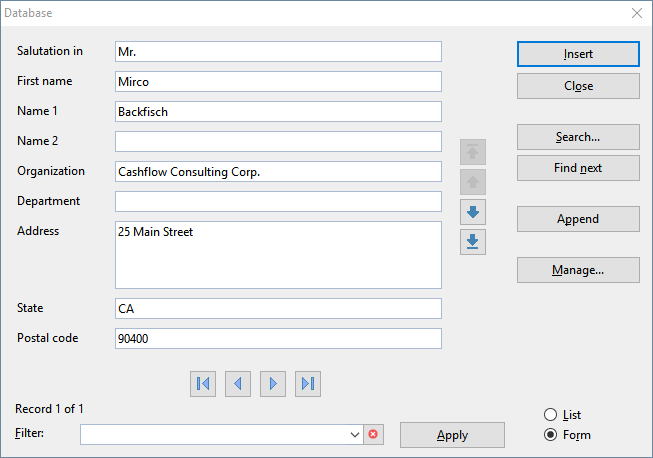
The dialog box shown above has the following controls:
Data display
Most of the window is devoted to the display of data.
You can view the data either in tabular form in the list view or in more detail in the form view. To select the desired view, click on the option List or Form in the lower part of the window.
Important: Note that the data can only be edited in the form view.
You do not have to choose a command to save changes to the data, as changes to the current record are automatically saved when you browse to another record or exit the database.
Filter
You can filter the records if necessary. To do so, enter a search term in the Filter input field and click on the Apply button. The display of data changes immediately and only records that contain the search term (in any data field) are displayed.
If, for example, you filter by "Jones", only records are displayed where one of the fields contains the term "Jones".
Use the cross icon ![]() to remove the filter.
to remove the filter.
"Insert" button
This option inserts the content of the current record into the document. It is only available if the database was accessed via a template as described above.
"Close" button
This option closes the database. All changes to the database are automatically saved.
"Search" button
This option opens a dialog box that allows you to search for specific data more accurately than with a filter (see above). For more information on this dialog box, see Searching a database.
Button "Search again"
This button displays the next record containing the search term.
"Append" button (SQLite and dBASE only)
This option appends a new record to the database.
Note: This is not possible for databases from PlanMaker, Excel or text files. They are read-only.
"Manage" button (SQLite only)
This option opens the dialog box Table settings, where you can customize the display of the selected field type for SQLite databases. Here, you only determine the way in which fields are displayed, but you do not change the actual database structure.
The options of the dialog box correspond to those of the command Table settings ![]() in the group Manage of the database module. For more information, see Changing the database structure.
in the group Manage of the database module. For more information, see Changing the database structure.
List/Form
You can use the options List and Form to switch between the list view (several records listed one after another) and the form view (a complete record in detail).
Tip: Where can I see which database is assigned?
To find out which database is assigned to your current document template, you have the following option: After you have inserted the record as described above, you can open the database module by choosing the ribbon command Mailings | group Recipients | Select recipients. Here, you can see the name of the assigned database in the title bar and in the tab.
Exit the database module again by clicking on the Close database icon ![]() . For the purposes described in this section, you do not need to work with the database module. If you want to learn more about using the database module, however, see Using the database module and Selecting records for a mail merge.
. For the purposes described in this section, you do not need to work with the database module. If you want to learn more about using the database module, however, see Using the database module and Selecting records for a mail merge.