We now come to the more interesting functions – for example, to text formatting, and thus to the use of fonts, text styles (bold, italics, etc.), indents, etc.
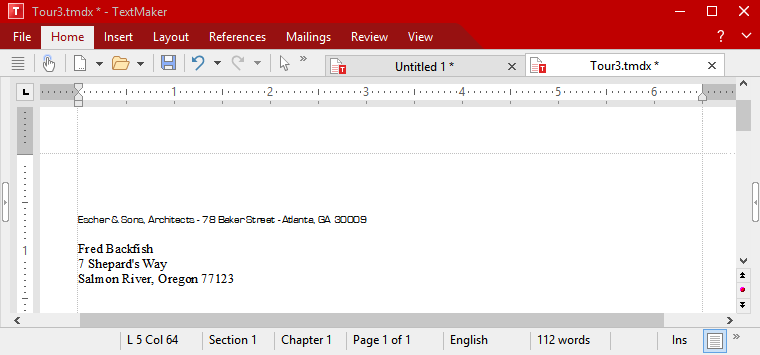
First, we will insert a line with our return address above the address, as is customary for letters that are to be sent in window envelopes.
Thus, let's position the text cursor two lines above the address (line 5) and type the address of our architecture firm: You can set common hyphens between the name, street and place.
Escher Architects – 78 Baker Street – Atlanta, GA 30009 |
However, this line is much too wide for the window of a window envelope, and so we would like to decrease the font size slightly. This brings us to an important topic: selecting.
First select, then format
Note: For more information on selecting, see Working with selections.
To subsequently change the formatting of a section of text, you must first select it to ensure that TextMaker knows which area to change.
To select the lines containing the address of our architecture firm, proceed as follows:
Mouse: While holding down the mouse button, drag the mouse cursor from the beginning to the end of the text you want to select. By the way, there is an easy way to select complete lines. Just click in the margin to the left of the line. The complete line will be immediately selected.
Keyboard: If you prefer to work with the keyboard, you can select text by moving the text cursor while holding down the Shift keyñ. In this case, select the address line by positioning the text cursor in front of the first character via the Home key and then pressing the key combination Shift+â.
Android/iOS: If you are using these versions, please note that selecting text there works slightly differently. For more information, see Selecting text and objects.
If you have selected the line with the address of the architecture firm, you can change the font size as required. To do so, search for the command group Character on the ribbon tab Home.
The command group "Character"
Note: For more information about text formatting, see Character formatting and Paragraph formatting.
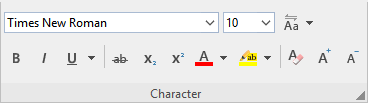
The font size of the selected text is displayed to the right of the font – a 10 point size is currently set. Click with the mouse on the arrow to the right of "10". This opens a list of the most common font sizes. Select "8" from the list.
Now also choose a different font. To do so, click on the arrow to the right of the font and choose the MicroSquare font from the list. If you have not installed this font, you can choose any other font you like.
![]()
The MicroSquare font in 8 point size was set.
Thus, the sender's and receiver's addresses should look something like this: