On the Options tab of the dialog box "Page setup", you can make settings that affect the printout of the current worksheet.
Note: These options must be set separately for each worksheet.
You open the dialog box by clicking on the group arrow![]() in the bottom right corner of the ribbon tab Layout | group Page setup. Switch to the Options tab.
in the bottom right corner of the ribbon tab Layout | group Page setup. Switch to the Options tab.
Alternatively, you can open the dialog box with the ribbon command File | group Print | Page setup.
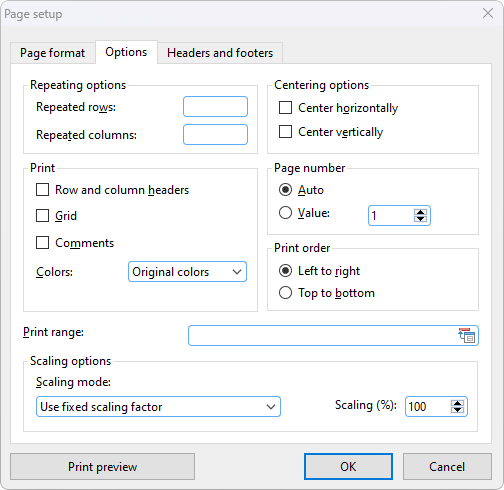
Here, you will find the following settings:
Repeated rows/Repeated columns
If the worksheet contains row labels or column labels, and you want them to be repeated on all printed pages, enter them here.
Use the following notation: FirstRow:LastRow (or FirstColumn:LastColumn, respectively)
If, for example, the first row of a long list of data contains a label to be repeated on all pages, enter 1:1 in the Repeated rows field to ensure this row is repeated on every page of the printout.
If, on the other hand, you want columns A to C to be repeated on each page, enter A:C in Repeated columns.
Select any of these options to include the following worksheet components in the printout:
▪Row and column headers: Print the row headers located to the left of the worksheet and labeled 1, 2, 3, etc. or the column headers located above the worksheet and labeled A, B, C, etc.
▪Grid: Print the gray gridlines between the cells.
▪Comments: Print the comments added with the ribbon command Insert | Comment.
| Note: Only comments that you have enabled for permanent display via the Comment visibility button will be printed. For more information, see Using comments. |
In addition, you can use the option Colors to specify if the printout should be rendered in color:
▪Original colors: The printout is rendered in its original colors.
▪Grayscale: Colored text is rendered in black and white, while colored objects (pictures, charts, etc.) are converted to shades of gray.
▪Outlines only: Colored text is rendered in black and white, while colored objects are reduced to their outline in black and white.
Centering options
If the option Center horizontally is enabled, the worksheet's content will be horizontally centered on the page when printed.
If the option Center vertically is enabled, the worksheet's content will be vertically centered on the page when printed.
Page number
This option lets you define the starting number for page numbers:
Auto: Pages are numbered starting with 1.
Value: Pages are numbered starting with the specified value.
Tip: To add page numbers to a worksheet, insert a Page number field into the header or footer (see next section).
Print order
Here, you define the order in which PlanMaker should output worksheets that are wider than a printed page.
▪Left to right
| Print from left to right, and then from top to bottom. |
▪Top to bottom
| Print from top to bottom, and then from left to right. |
Print range
Here, you can define a print range for the current worksheet.
When a print range is defined, only those cells that are within this cell range will appear when the worksheet is printed. The rest of the worksheet will be omitted.
By default, this input field is empty, thus no print range is defined and the entire worksheet will be printed. If you type in a cell range (or the name of a named range) here, however, only this range will be generally output when the worksheet is printed.
A print range can be defined individually for each worksheet of the document.
Important: When you save a document, this setting will be permanently stored in the document. Thus, if you subsequently open and print this document again, the printout will still contain only those cells within the print range. If you want the entire worksheet to be printed again, simply clear the Print range input field in this dialog box to remove the print range.
Tip for working with print ranges:
Alternatively, there is a slightly more convenient method: You can also define a print range for a worksheet by selecting the desired cell range and then choosing the command Define print range directly from the ribbon tab Layout | group Page setup.
To do so, either click on the icon itself – or click on the icon's small arrow and select the command Define print range in the dropdown menu. If you select Remove print range here, you can remove the print range again.
Note: To ensure that only the defined print range is printed, the option Ignore print range must be disabled in the dialog box of the command File | Print. This is the default setting. For more information, see Printing a document.
Tip for checking the print range:
To visually check the selected print range, you can use the option Page break preview (not available in SoftMaker FreeOffice) on the ribbon tab View. The selected print range is indicated by the white area and can be further adjusted by dragging the wrap lines with the mouse. For more information, see Adjusting page breaks manually.
Scaling options
These options enable you to scale printouts of the document up or down.
By default, a fixed scaling factor of 100% is set (which means that the original size is used).
To change the scaling, first select a Scaling mode, and then set the desired value as follows:
▪Use fixed scaling factor: Here, you can set the scaling factor manually (in percent). Only values between 20 and 200 percent are permitted. If, for example, you set the scaling factor to 50%, the printout will be scaled down to half its original size. If you set it to 200%, the printout will be doubled in size.
For the other 4 scaling modes, the scaling factor is calculated automatically according to your settings:
▪Specify height in pages: Here, you specify the desired height of the printout in pages. PlanMaker will determine the corresponding scaling factor automatically.
▪Specify width in pages: Here, you specify the desired width of the printout.
▪Specify height and width in pages: Here, you specify the desired maximum height and width of the printout.
▪Specify number of pages in total: Here, you specify how many pages the printout should have in total.
Note: PlanMaker does not allow the automatically determined scaling factor to be less than 20%. If this value is not reached, PlanMaker automatically uses the minimum allowed value of 20%. The same applies to the maximum value of 200%.